

Running a performant, resilient application in the pre-cloud era was hard. Especially with unpredictable user traffic, it was often necessary to use more hardware than needed, just to make sure the application can handle an increased load. Kubernetes makes our life a lot easier and can automatically scale your application out and in, depending on the usage of your application.
Today, I will show how to use the Horizontal Pod Autoscaler (hpa) to automatically scale your application out and in which helps you to offer a performant application and minimize your costs at the same time.
This post is part of “Microservice Series - From Zero to Hero”.
How the Horizontal Pod Autoscaler (HPA) works
The Horizontal Pod Autoscaler automatically scales the number of your pods, depending on resource utilization like CPU. For example, if you target a 50% CPU utilization for your pods but your pods have an 80% CPU utilization, the hpa will automatically create new pods. If the CPU utilization falls below 50%, for example, 30%, the hpa terminates pods. This ensures that you always run enough pods to keep your users happy but also helps you not waste money by running too many pods.
Besides CPU utilization, you can also use custom metrics to scale. These custom metrics can be, for example, response time, queue length, or hits-per-second. In my last post, Manage Resources in Kubernetes, I set resource requests for pods. If you don’t set them, the hpa won’t be able to scale based on CPU utilization.
In the hpa, you can configure the minimum and maximum amount of pods. This prevents the hpa from creating new pods (until you run out of resources) when your application goes haywire but also ensures a bottom line to guarantee high availability. The Horizontal Pod Autoscaler checks by default the metrics every 15 seconds. You can configure the interval with the -horizontal-pod-autoscaler-sync-period flag.
Create a Horizontal Pod Autoscaler
You can find the code of the demo on GitHub.
In my demo, I am using Helm to deploy my application to Kubernetes. You don’t have to use Helm though and can just apply the yaml file I will create to your Kubernetes cluster.
To create the Horizontal Pod Autoscaler, create a new yaml file named hpa inside the templates folder inside the Helm charts folder and paste the following code into the file:
This config creates a Horizontal Pod Autoscaler if the hpa.enabled flag is set to true. Then it configures the specification with the maximum and minimum amount of replicas and at the end the target metric. In this example, the target metric is CPU utilization. All values starting with .Values are provided by the values.yaml file. Using the values.yaml file allows you have one file where you can override the configuration of your Helm charts. In my next post, I will show how to use a Tokenizer to apply dynamic values during your deployment.
If you use the values.yaml file, add the following section:
If you don’t use the values file, you can replace the placeholders in the hpa with actual values:
This value can be configured using the –horizontal-pod-autoscaler-downscale-stabilization flag, which defaults to 5 minutes. This means that scaling down will occur gradually, smoothing out the impact of rapidly fluctuating metric values.
Note that you should never run only one pod for production applications. I would recommend running at least 3 pods to ensure high availability.
Deploy the Horizontal Pod Autoscaler
Deploy the hpa to your Kubernetes cluster. If you want to learn how to deploy the Helm charts to Kubernetes, check out my post Deploy to Kubernetes using Helm Charts. After the deployment is finished, check that the hpa got deployed correctly. You can use kubectl or a dashboard to check if the hpa values are set correctly. For more information about using a dashboard, see my post Azure Kubernetes Service - Getting Started.

The hpa got deployed
Load testing a Microservice
There are many load testing tools out there. I wrote a super simple one myself and added it to the root of the GitHub repository inside the AutoscalingDemo folder. The code looks as follows:
The test application creates 500 threads and calls my microservice to calculate a prime number. This is quite CPU heavy and will trigger the hpa to scale out my microservice. If you run this code, replace the string for the GetStringAsync method with your URL.
Load test the Microservice without auto-scaling
First, I run the load test without the hpa. This means that only one pod processes all requests which should take some time because the pod will run at 100% capacity.
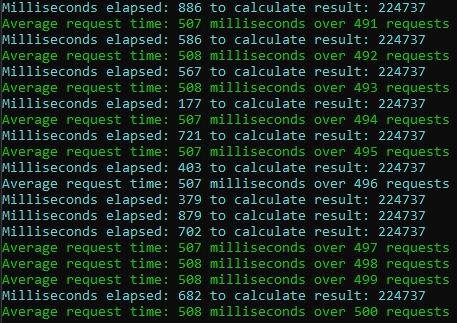
Run the load test with one pod
The average response time is 508 milliseconds and when I open the Swagger UI of the microservice, it feels unresponsive.
Load test the Microservice with auto-scaling using the HPA
After deploying the hpa, I run the test again.
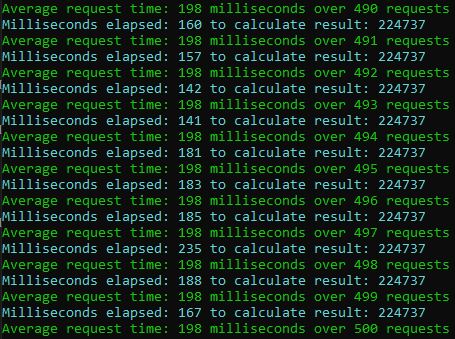
Run the load test with auto-scaling
Using the hpa to scale out the microservice decreased the average response time to 198 milliseconds. Also, the Swagger UI feels responsive and usable.
Scaling using the Horizontal Pod Autoscaler
So far we have seen that the response time during the load time was way better when using a hpa. Let’s check what happened behind the scenes. If you open the hpa in the dashboard, you can see its events. There you can see that the hpa first scaled to four pods and then to seven.

The hpa scaled to seven pods
When you check the pods of the microservice, you will see that seven pods are running.
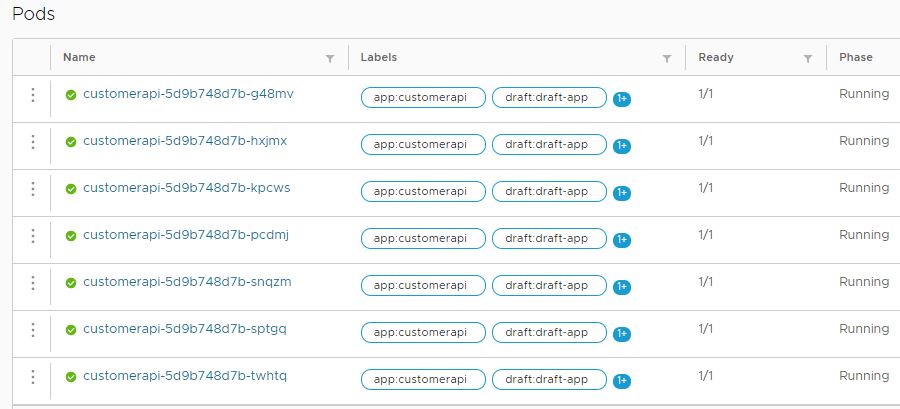
Seven pods of the microservice are running
After all, requests are processed (and a cooldown phase), the hpa scales in the pods. Since there is no load at all, it removes all pods but one. If you configured the minimum replicas to three, the hpa would scale to three pods.
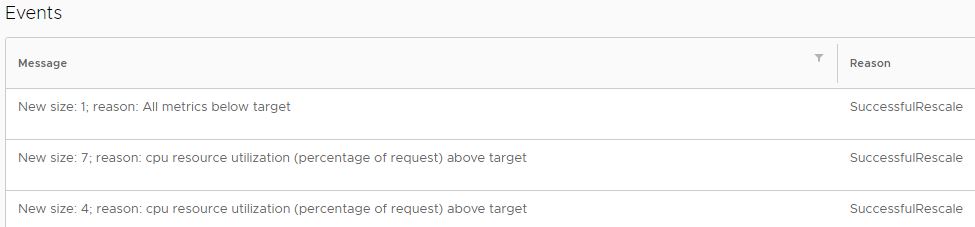
The hpa scaled in to one pod
More Horizontal Pod Autoscaler Configuration
The hpa offers a wide range of additional features and configurations. In this section, I will shortly highlight some of them.
Scale in Delay
Some workloads are highly variable which would lead to a constant scaling (in or out). To prevent this and have a more stable number of pods, use the –horizontal-pod-autoscaler-downscale-stabilization flag to set a timeframe between scale in operations. The default value is 5 minutes. This means if the hpa scales in, the next scale in can happen in the earliest 5 minutes.
Scaling Policies
Scaling policies allow you to configure for how long a certain value has to be reached until scaling happens. This could be for example, only scale out if the CPU utilization is higher than 70% for more than 30 seconds and only scale in if the CPU utilization is below 30% for 30 seconds. The code for this looks as follows:
Policies can also be used to limit the rate of downscale, for example, only removing 3 pods per minute when scaling down.
Stabilization Window
The stabilization window restricts the hpa from scaling out or in too frequently. For example, if you set the stabilization window to 3 minutes (180 seconds) the timespan between scaling operations is at least 180 minutes. You can configure the stabilization window for scaling out and in independently. The following code shows a stabilization window for scaling down:
Conclusion
The Horizontal Pod Autoscaler allows you to configure automatic scaling. This can be scaling out to increase the throughput and performance of your application or scaling in to reduce the used resources and therefore the costs. Scaling can be performed on simple metrics like CPU utilization or on more complicated metrics like response time or hits per second. Additionally, metrics can be combined.
You can find the code of the demo on GitHub.
This post is part of “Microservice Series - From Zero to Hero”.
Comments powered by Disqus.