

In my last post, I created an Nginx ingress controller and assigned different URLs to its public URL. The Nginx controller analyses the URL and routes the traffic automatically to the right application. The solution presented worked but only used HTTP. Nowadays, browsers show a warning when the connection is not using HTTPS and users also expect to have secure connections.
This post will show you how to configure a cert-manager and automatically issue certificates for your applications.
This post is part of “Microservice Series - From Zero to Hero”.
Install Cert-Manager
You can find the code of the demo on GitHub.
Cert-Manager is a Kubernetes add-on that issues automatically TLS certificates for your applications. You can find it on GitHub. To install the cert-manager using Helm charts, execute the following commands:
I use the ingress-basic namespace also for Nginx. If you want, use a different one for the cert-manager.
Install a Let’s Encrypt Certificate Issuer
After installing the cert-manager, install a certificate issuer to generate the tls certificates for your applications.
Save the code in a file and then apply the file to your Kubernetes cluster
This example uses Let’s Encrypt as the issuer but you can use any CA issuer you want. Before you deploy the code, add your email so you can get emails about the certificates. At the beginning of the code, you can see that the kind of object is ClusterIssuer. A ClusterIssuer can create certificates for all applications, no matter in what namespace they are. The second option is Issuer which works only in a single namespace. An issuer might be useful if you want to use a different CA issuer.
Update the Microservices to use the TLS Certificate
There is not much to update in the configuration of the microservice to use the TLS secret. All you have to do is add the TLS secret and the host before the rules section in the ingress.yaml file of each microservice. The ingress.yaml file is part of the Helm chart. If you don’t know Helm, see my posts Helm - Getting Started and Deploy to Kubernetes using Helm Charts.
The ingress.yaml file looks as follows:
The OrderApi ingress file looks the same, except that the name is orderapi instead of customerapi.
Next, add the TLS secret name and the host to the values.yaml file.
The variables, for example, __TlsSecretName__ are defined in the CI/CD pipeline and will be replaced by the Tokenizer. For more information about the Tokenizer, see Replace Helm Chart Variables in your CI/CD Pipeline with Tokenizer.
You can use whatever name you want for the TLS secret.
The last step is to add an additional annotation to the ingress of the microservice. Add the following line to the annotations section of the values.yaml file:
This is all you have to configure to automatically use HTTPS and also use SSL termination in the Nginx ingress controller. This means that the traffic inside the cluster uses only HTTP and therefore doesn’t use any compute power to decrypt the connection.
Using HTTPS to access the Microservice
Deploy the Microservice and then call their URL, in my case, customer.programmingwithwolfgang.com. You should see that HTTPS is used and that a valid certificate is used.
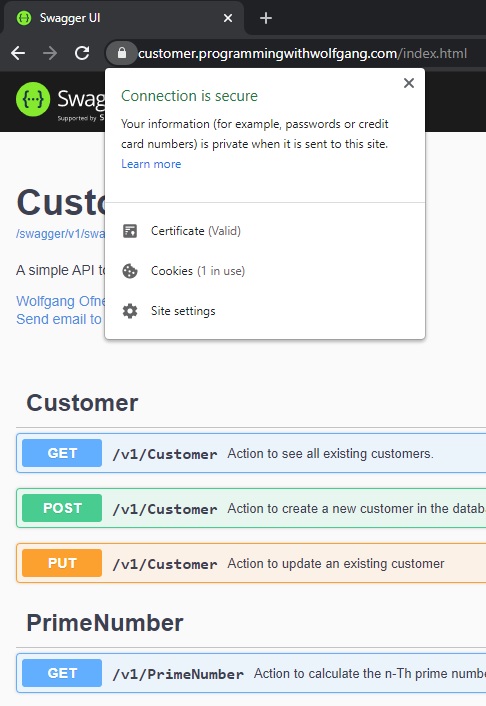
A valid SSL Certificate got created
Troubleshooting
If something did go wrong, you might see a warning when you try to access the microservice using HTTPS.
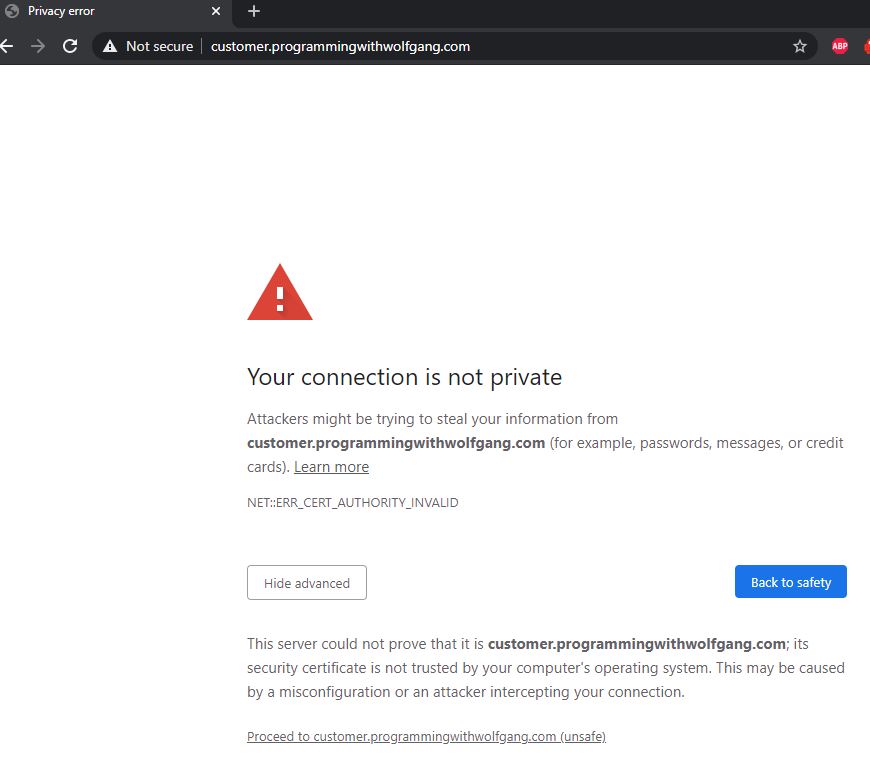
The SSL Certificate is not valid
If you see this message, check if you added the letsencrypt annotation. I forget this one almost always. If this didn’t fix the problem check if there is a certificate in your namespace with the following command:
This should display your certificate.

The SSL Certificate got added to the Namespace
Conclusion
A cert-manager creates SSL certificates automatically in your Kubernetes cluster and helps you to reduce the time to fully configure your application. This is especially useful when you use multiple test environments.
In my next post, I will show you how to separate the CI/CD pipeline into two pipelines which will enable you to make changes faster and with fewer errors.
You can find the code of the demo on GitHub.
This post is part of “Microservice Series - From Zero to Hero”.
Comments powered by Disqus.