

In this post, I want to talk about how controllers and actions interact with each other and present several built-in functions. The MVC Framework is endlessly customizable and extensible. As a result, it is possible to implement your own controller which I will shortly talk about and show how to do that.
Setting up the project
I created a new ASP.NET MVC project with the empty template and add folders and core references for MVC.
Set up the ASP.NET MVC project
Throughout this post, I will only use the default route. This post describes the basics of controllers and actions but I will not explain every single simple step. Therefore it is expected that you know at least how to create a controller and how to call its Index action.
Passing data to an action
Following I will show several options, how to pass data to the action. First I start with the simplest way to call an action though. The easiest way to call an action is by entering an URL which is mapped to a route and redirected to the fitting action.

Simple Action
The Index action does nothing except returning a view to the user’s browser. Therefore it does not take or process any data.
Passing data to the parameter
A simple way to pass data to an action is by using a parameter for the action. The parameter will be added at the end of the URL.
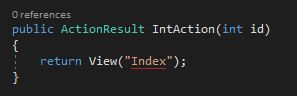
Action with int parameter
As you can see, I used int as the data type for the parameter. If the user enters a parameter which can not be converted to an int, ASP.NET MVC throws an exception and displays the yellow screen of death. To prevent this exception, it is possible to set a default parameter. If the framework can’t convert the parameter provided by the user, the default parameter is used.
Using a parameter to pass data to a method makes it also way easier to unit test.
It is also interesting to note that parameter can’t have out or ref parameter. It wouldn’t make any sense though and therefore ASP.NET MVC would throw an exception.
Passing multiple parameters to the action
There are two options on how to pass multiple parameters to an action. The first option is to use the catchall variable in the route. To do that, you have to configure the route first, as shown in the following screenshot.

Catchall route
After setting up the route, you can use the catchall variable as the parameter and add as many variables as you want to it. The variables are all passed as one string and have to be parsed. The following screenshot shows one id and three variables in the catchall are passed to the method.

Catchall action
The second way is to use multiple parameters. This method is used to pass data from a form to the action.
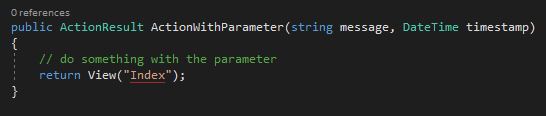
Action with multiple parameter
Retrieving data within an action
Besides parameter, there are several other sources from where you can receive data. These data sources can be:
- Request
- User
- Server
- HttpContext
- RouteData
I would suggest to type these classes into your action and look through the options provided by the intellisense. On the following screenshot, I show some of these options.
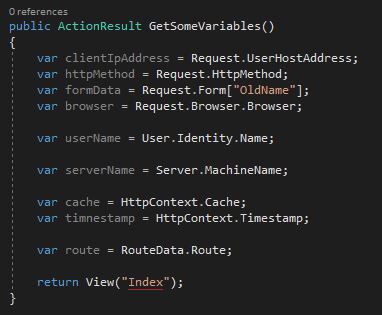
Action with different sources to get some data
ActionResult types
Action results help to make the code easier and cleaner and also make unit testing easier. The ActionResult class is an abstract class which can be used. But there are also a whole bunch of derived classes which can be used to increase the readability of the action. If you are familiar with the command patter, you will recognize it here. ActionResults pass around objects that describe the operations which are performed.
As I just mentioned, there is a whole list of action results. Following I will present some of them.
Returning a view
Returning a view is the easiest way to present an HTML page to the user. Using ActionResult as return type works and compiles. Though I prefer using ViewResult for views because it tells me faster what the actual return type is. There are different overloaded versions of View().
View without parameter
The simplest is without a parameter. When using this version, the MVC framework searches for a view with the same name as the action.
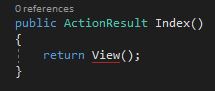
View without parameter
The framework searches in the following locations:
- /Areas/
</span>/Views/ </span>/ </span>.aspx - /Views/
/ .aspx - /Areas/
</span>/Views/ </span>/ </span>.ascx - /Views/
/ .ascx</span> - /Areas/
</span>/Views/Shared/ </span>.aspx - /Views/Shared/
</span>.aspx</span> - /Areas/
</span>/Views/Shared/ </span>.ascx - /Views/Shared/
</span>.ascx</span> - /Areas/
</span>/Views/ </span>/ </span>.cshtml - /Views/
</span>/ </span>.cshtml</span> - /Areas/
</span>/Views/ </span>/ </span>.vbhtml - /Views/
</span>/ </span>.vbhtml</span> - /Areas/
</span>/Views/Shared/ .cshtml</span> - /Views/Shared/
</span>.cshtml</span> - /Areas/
</span>/Views/Shared/ </span>.vbhtm - /Views/Shared/
</span>.vbhtml</span>
The MVC framework also searches for ASPX views, C# and Visual Basic .NET Razor templates. This behavior guarantees backward compatibility with earlier versions of the MVC framework
If the file is found in one of the locations, it is returned and the search stops. If no file is found, a yellow screen of death is shown with some information which locations where searched.
View with name parameter
By default, the framework searches for a view with the same name as the action. If you want to return a view from the same controller but with a different name, you have to pass the name as the parameter in the view.
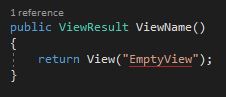
View with view name
View with path
Sometimes the view you want to return is in a different directory. Then you can pass the path to the view as the parameter. Note: Don’t forget the tilde at the beginning of the path. Otherwise, you won’t get the expected view.
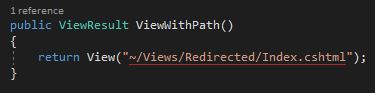
View with path
It is very uncommon to use this feature and it is a hint that your design might not be optimal.
View with a view model
All versions of the view which I showed above also have the option to pass a view model. To pass the view model to the view, simply add it as a parameter. On the following screenshot, I pass the path to the view and the view model (which in this case is just a string).
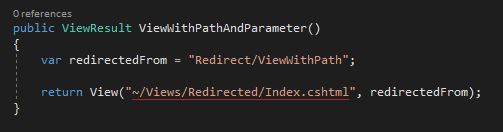
View with path and view model
When you use only a view model which is a string, the ASP.NET MVC framework thinks that it is the name of the view you want to return. To tell the framework that it is a model, you have to prefix the model with the model: keyword.

View with model keyword
Passing data with a view model
Previously I showed how to pass a model to the view. Now there are two different ways to use this view model in the view. Either you cast the model to its data type and then use it inline, for example, @(((DateTime)Model).ToLocalTime()) or you can declare the model and its data type and then use it like a normal C# variable.

View with view model
Casting the object works but it makes the view pretty messy. Therefore I recommend using strongly typed views. It is important to note that when declaring the model it starts with a lower case and when using it, it starts with an upper case.
Passing data with view bag
Another way to pass data to a view is with the view bag. The difference between the view bag and the data model is that the view bag is a dynamic object. The view bag doesn’t have to be passed to the view but can be used in the view like the view model.
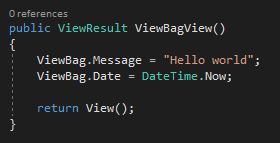
Adding data into the view bag
Due to its dynamic behavior, I don’t have to declare the view bag variable before using it. I can simply assign my data to it.
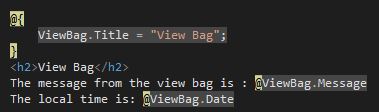
View with view bag
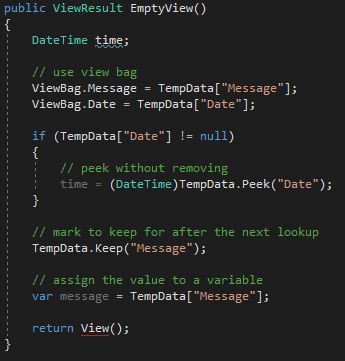
Passing data with temp data
Temp data works like the view bag with one difference. After reading the data from temp data, the values get marked for deletion. The usage is similar to the usage of a session.

Assigning values to temp data
If the value is a primitive data type, it can be used like the session. If it is an object, you have to cast it.

Using temp data in a view
Keeping data
There are three different ways to store the values from temp data:
- Assign it to the view bag
- Assign it to a variable
- Use Peek() or Keep()
Peek returns the value without marking it for deletion. Keep marks the value to keep it after it was accessed. When the value is accessed a second time, it gets marked for removal if you don’t use Keep again.
Ways to store data from temp data
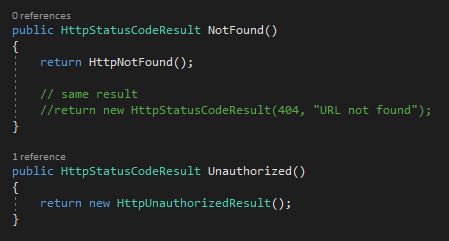
Returning an HTTP status code
ASP.NET MVC hat to built-in classes for returning an HTTP status code
- HttpNotFoundResult
- HttpUnauthorizedResult
Additionally, you can return every HTTP status code you want with HttpStatusCodeResult. Pass the status code and a message as parameter. HttpNotFoundResult has a short form, HttpNotFound. The return value for a status code is HttpStatusCodeResult.
Working with HttpStatusCode
More results
Additionally, to the action results, I just presented there are some more like:
- PartialViewResult
- FileResult
- JsonResult
- JavaScriptResult
- EmptyResult
The names are speaking for themselves. Therefore I won’t go into more detail about them.
Performing redirects
A common performance of an action is to redirect the user to another URL. Often this URL is another action which generates an output for the user.
The Post / Redirect / Get pattern
The Post / Redirect / Get pattern helps to avoid the problem of resubmitting a form for the second time which could cause unexpected results. This problem can occur when you return HTML after processing a POST and the user clicks the reload button of his browser which results in resubmitting his form.
With the Post / Redirect / get pattern the POST request is processed and then the browser gets redirected to another URL. The redirect generates a GET request. Since GET requests don’t (shouldn’t) modify the state of the application, any resubmission of the request won’t cause any problems.
Temporary and permanent redirects
There are two different HTTP status codes for redirects:
- 301 for permanent redirection
- 302 for temporary redirection
The HTTP code 302 is often used, especially when using the Post / Redirect / Get pattern. Be careful when using this cause because it instructs the recipient to never again use the requested URL and use the new URL instead. If you don’t know which code you should use, use temporary redirects.
ASP.NET MVC offers for every redirect a temporary and permanent implementation. For example, you can use Redirect() for a temporary redirect or RedirectPermanent() for a permanent redirection.
Redirect to a view
If you want to redirect to a view, use the Redirect or RedirectPermanent method with the folder and index name as a string parameter. You don’t have to provide the file ending of the view. The return value of this is RedirectResult.

Redirect to view
Redirect to a route
To redirect from an action to a route use RedirectToRoute or RedirectToRoutePermanent. The methods take an anonymous type with the route information. The return value is RedirectToRouteResult.

Redirect to route
Redirect to an action
More elegantly than redirecting to a route is redirecting to an action. RedirectToAction and RedirectToActionPermanent are wrapper for RedirectToRoute and RedirectToRoutePermanent but make the code cleaner in my opinion. The values provided as a parameter for the action and controller are not verified at compile time. This means that you are responsible for making sure that your target exists.

Redirect to action
Conclusion
In this post, I showed how to pass data into an action and how to retrieve data within an action from different sources. Then I presented some of the ActionResult types which are built-in into the MVC framework and also how to pass data between actions using ViewBag and TempData.. In the last part, I talked about the different ways how to perform redirects.
For more details about how controller and actions work, I highly recommend the books Pro ASP.NET MVC 5 and Pro ASP.NET MVC 5 Plattform.
I uploaded the source code to GitHub.
Comments powered by Disqus.