

In my last post, KEDA - Kubernetes Event-driven Autoscaling, I showed how to deploy a KEDA scaler to scale a microservice depending on the queue length of an Azure Service Bus Queue. The deployment of KEDA used Helm and the autoscaler was deployed using a simple YAML file. This is fine to learn new tools and technologies but in a modern DevOps environment, we want to have an automated deployment of KEDA itself and also of the scaler.
In today’s post, I will show you how to deploy KEDA to Kubernetes using an Azure DevOps pipeline and how to add the KEDA scaler to the Helm charts of an existing microservice.
This post is part of “Microservice Series - From Zero to Hero”.
Deploy KEDA with an Azure DevOps Infrastructure as Code (IoC) Pipeline
You can find the code of the demo on GitHub.
In one of my previous posts, Use Infrastructure as Code to deploy your Infrastructure with Azure DevOps, I created a YAML pipeline in Azure DevOps to deploy my whole infrastructure to Azure. This included the Azure Kubernetes Service cluster, an SQL database server, several components for Kubernetes like a cert-manager and ingress controller, and many more. The pipeline uses YAML and Azure CLI to define the services. The big advantage of having such a pipeline is that I can easily create my whole infrastructure from scratch with a single button click. This makes it fast, and easily repeatable without worrying about forgetting anything.
This pipeline is perfect to create a new namespace in the Kubernetes cluster, add the Helm chart for KEDA and install it.
First, add the following two variables to the pipeline. This is not necessary but I like to have most of the configuration in variables at the beginning of the pipeline.
Next, use the HelmDeploy task of Azure DevOps and add the Helm chart of KEDA to your Kubernetes cluster.
After adding the Helm chart, update it with the following lines of code:
The last step is to install the previously added Helm chart. Use the –create-namespace argument to create the namespace if it does not exist and also make sure to add a version number. Without the version, the deployment will fail.
Add the Azure Service Bus Queue Scaler to an existing Microservice Helm chart
You can find the code of the demo on GitHub. If you want to learn more about Helm see Helm - Getting Started and Deploy to Kubernetes using Helm Charts.
Inside the demo application, you can find the KedaDemoApi, and inside there are the charts and kedademoapi folder. Helm reads the YAML files inside this folder and creates Kubernetes objects. To add the KEDA scaler to the Helm chart, create a new file and name it kedascaler.yaml. This file will contain the ScaledObject which configures the trigger. The file has the following content:
Next, create a second file, called kedatriggerauthentication.yaml, which will contain the Trigger-Authentication. This file will configure the access of the Scaled Object to the Azure Service Bus Queue and references a secret in Kubernetes.
Helm is a template engine that replaces the placeholder in the double braces with the corresponding values in the values.yaml file. For example, {{ .Values.kedascaler.minReplicaCount }} will be replaced with the value of the variable minReplicaCount in the kedascaler section of the values.yaml file.
Add the following values at the bottom of the values.yaml file:
Replace Variable Values during the Deployment in the Continous Deployment Pipeline
The values in the values.yaml file are hard-coded but it is also possible to pass variables. The secretKey value AzureServiceBus__ConnectionString is such a variable. You can set this variable in your CI or CD pipeline and use the Tokenizer task to replace AzureServiceBus__ConnectionString with the actual value of the variable. For more details, see Replace Helm Chart Variables in your CI/CD Pipeline with Tokenizer.
Testing the Implementation
Run the Infrastructure pipeline and afterwards the CI pipeline of the KedaDemoApi. Both pipelines should finish successfully.
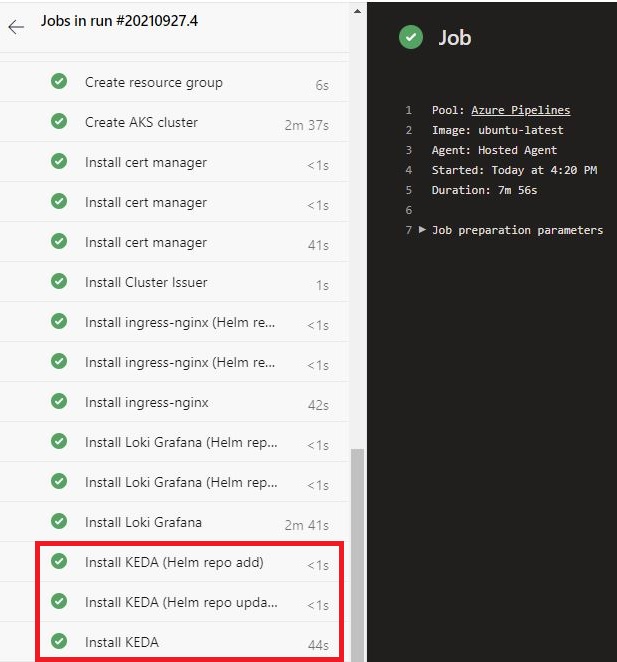
Install KEDA using the Infrastructure Pipeline

The Microservice with the Scaler was deployed successfully
Conclusion
CI/CD YAML pipelines in Azure DevOps can be used to easily install KEDA using Helm charts. This allows for fast, reproducible deployments which results in a low error rate. Helm can also be used to deploy the KEDA scaler with an existing microservice. This allows developers to quickly add the KEDA scaler to the Helm chart and also does not require any changes in the deployment pipeline to deploy the new scaler.
You can find the code of the demo on GitHub.
This post is part of “Microservice Series - From Zero to Hero”.
Comments powered by Disqus.