

Azure Storage has a built-in analytics feature called Azure Storage Analytics used for collecting metrics and logging storage request activity. Storage Analytics Metrics are used to collect aggregate transaction and capacity. Storage Analytics Logging is used to capture successful and failed request attempts to your storage account. In this post, I will talk about different methods to manage the access and monitor storage accounts.
Generate Shared Access Signatures
By default, storage resources are protected at the service level. Only authenticated callers can access tables and queues. Blob containers and blobs can optionally be exposed for anonymous access, but you would typically allow anonymous access only to individual blobs. To authenticate to a storage service, a primary or secondary key is used, but this grants the caller access to all actions on the storage account.
A shared access signature (SAS) is used to delegate access to specific account resources without enabling access to the entire account. An SAS token lets you control the lifetime by setting the start and expiration time of the signature, the resources you are granting access to, and the permissions being granted.
The following operations are supported by SAS:
- Reading or writing blobs, blob properties, and blob metadata
- Deleting blobs
- Listing blobs in a container
- Adding, updating, or deleting table entities
- Querying tables
- Adding and updating queue messages
- Processing queue messages
The SAS token should be stored in the Azure Key Vault.
Creating an SAS token with C#
You can find the following code demo on GitHub. To learn how to create a container, queue and table see Implement Azure Storage blobs and Azure files and Implement Azure Storage Tables, Queues, and Azure Cosmos DB Table API.
The following code creates an SAS token for a blob container with a start time and expiration time. Before you start, install the WindowsAzure.Storage NuGet package.
Add the following code to your App.config file and replace the placeholder with your account name and

Add the connection string to your storage account to the App.config file
Use the following code to create an SAS token for your blob with read, write, delete and list rights. The token will expire in one hour.
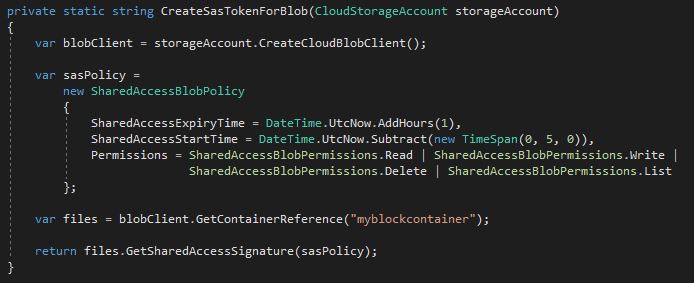
Create an SAS token for a blob
With the SAS token, you can access your container.
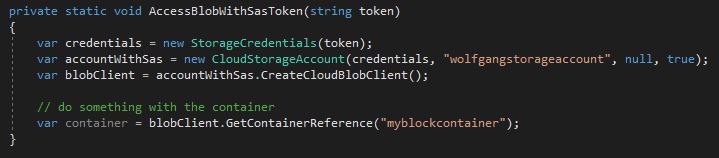
Access the blob container with the SAS token
Use the following code to create an SAS token for your queue with read, add, update and processMessages rights. The token will expire in one hour.
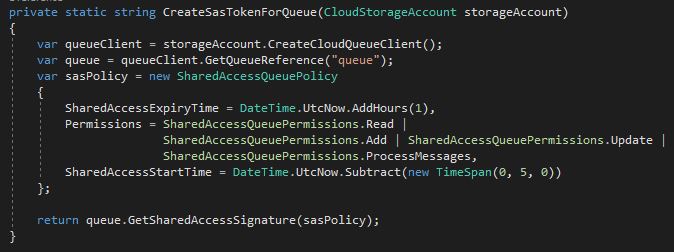
Create an SAS token for a queue
With the following code, you can access your queue and add a new message.

Access the queue with the SAS token and add a new message
Use the following code to create an SAS token for your table with query, add, update and delete rights. The token will expire in one hour.
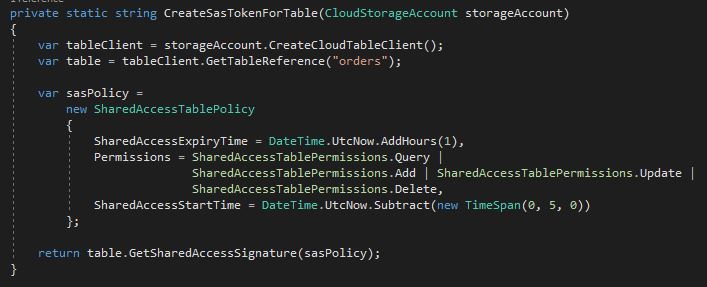
Create an SAS token for a table
With the SAS token, you can access your table.
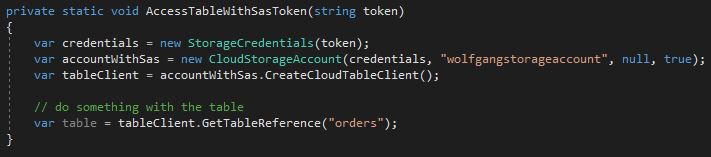
Access the table with the SAS token
Creating an SAS token in the Azure Portal
Additionally, to creating the SAS token in your code, you can create it in the Azure Portal. To do that follow these steps:
- In your storage account select the Shared access signature blade under the Settings menu.
- Select the following attributes:
- allowed services, resource types, and permissions
- start and expiry date and time
- optionally the allowed IP addresses
- allowed protocols
- signing key
- After you set your desired attributes, click on Generate SAS and connection string.
- Below the button can you find the SAS token and the URLs to your resources.
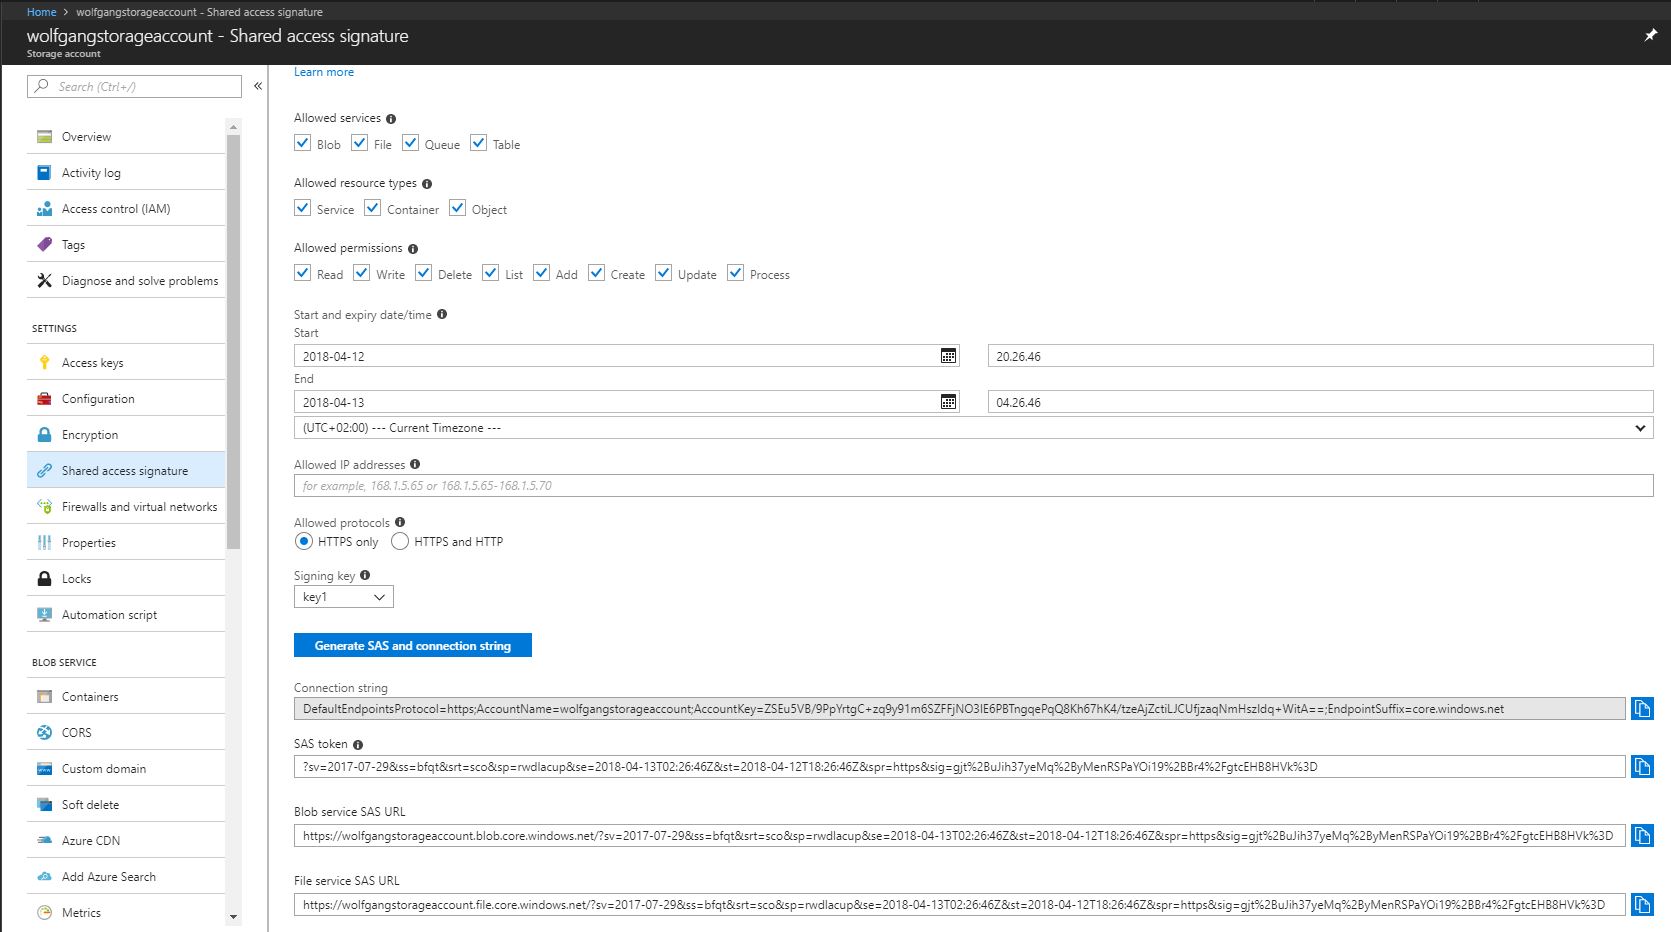
Create an SAS token in the Azure Portal
Renewing an SAS token
You can extend access to the same application or user by using new SAS tokens on requests. This should be done with appropriate authentication and authorization in place.
Validating data
When you give write access to storage resources with SAS, the contents of those resources can be made corrupt or be tampered with by a malicious party. Be sure to validate system use of all resources exposed with SAS keys.
Create stored access policies
Stored access policies provide greater control over how you grant access to storage resources using SAS tokens. With a stored access policy, you can do the following after releasing an SAS token for resource access:
- Control permissions for the signature
- Change the start and end time for a signature’s validity
- Revoke access
The stored access policy can be sued to control all issued SAS tokens that are based on the policy. It is best practice to use stored access policies wherever possible, or at least limit the lifetime of SAS tokens to avoid malicious use.
Create and test stored access policies programmatically
You can create SAS tokens and stored access policies programmatically with C#. I added two C# console applications to my GitHub account. The first application sets everything up and the test client tests the access with the SAS tokens.
Note that the test client won’t be able to delete blobs or container because stored access policy has only read and write rights.
Before you can start, you have to replace YourAccountName and YourAccessKey in the app.config with the name and access key of your storage account. Then you can run the first application and copy the output for the variables needed in the test client. Then you can run the test client and see the result.
You can find the application to create the stored access policies here and the test client here.
Regenerate account keys
When you create a storage account, two 512 bit storage access keys are generated which are used for authentication to the storage account. Since there are two keys, it is possible to regenerate them without impacting the access to storage of your applications.
To regenerate your keys without interrupting the access of your applications, follow this strategy:
- Change your application configurations to use the secondary key.
- Regenerate the first key.
- Change your application configurations to use the primary key.
- Regenerate the second key.
To regenerate your storage account keys, follow these steps:
- In the Azure Portal, select your storage account and click on Access keys under the Settings menu.
- Click on the Regenerate button of the key you want to regenerate.
- Click on Yes in the confirmation dialog.
- Your key is regenerated.
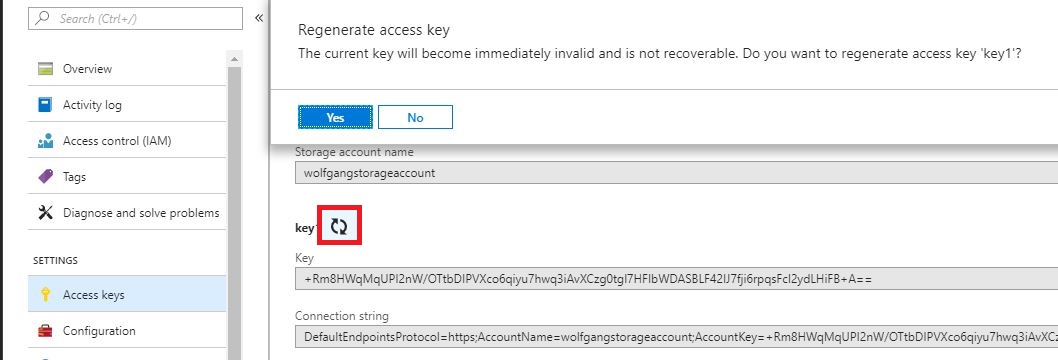
Regenerate the primary key
The keys should be stored in the Azure Key Vault.
Configure and use Cross-Origin Resource Sharing
Cross-Origin Resource Sharing (CORS) enables web applications running in the browser to call web APIs that are hosted by a different domain. By default CORS is disabled, but you can enable it for a specific storage service. To enable CORS for blobs, follow these steps:
- In the Azure Portal, select your storage account and click on CORS under the Blob Service menu. (There is a CORS blade for every resource type. If you want to add a CORS rule for your queue, select the CORS blade under the Queue Service menu)
- Click on +Add at the top of the blade.
- On the Add CORS rule blade, enter your configuration
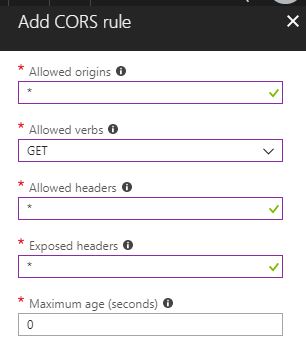
Add a new CORS rule to your blob
- On the screenshot above, you can see the allow origins are allowed by using *, only HTTP GET requests are allowed, allowed headers and exposed headers are all allowed and no maximum age for the request is defined.
- After you entered your settings, click on Add.
Configure and Monitor metrics
Storage Analytics metrics provide insight into transactions and capacity for your storage accounts. By default, the storage metrics are not enabled. You can enable them using the Azure Portal or PowerShell.
When you configure storage metrics for a storage account, tables are generated to store the output of the metrics collection. You set the level of metrics collection for transactions and the retention level for each service (blob, table, queue). Additionally, you can set the interval for the metric collection (hourly or by minute).
There are two levels of metrics collection:
| Metric collection level | Description |
| Service level | The metrics include aggregate statistics for all requests, aggregated at the specified interval. If no requests are made, an aggregate entry is still created for the interval, indicating no requests for that period. |
| API level | These metrics record every request to each service and only if a request is made within the interval. |
By default, Storage Analytics will not delete any metrics data. When the shared 20 TB limit is reached, no new data can be written until space is freed. You can specify a retention period from 0 to 365 days. Metrics data is automatically deleted when the retention period is reached for the entry.
Configure storage metrics and retention
To configure storage metrics and retention for Blob, Table, and Queue services, follow these steps:
- In the Azure portal, go to your storage account and select Diagnostics under the Monitoring menu.
- On the Diagnostics blade, click On under the Status property to enable the options for metrics and logging.
- You can set different settings for each storage type by switching between the tabs beneath the Status slider.
- Set your desired settings and set a value for retention by moving the slider or entering a number between 0 and 365.
- Click Save.
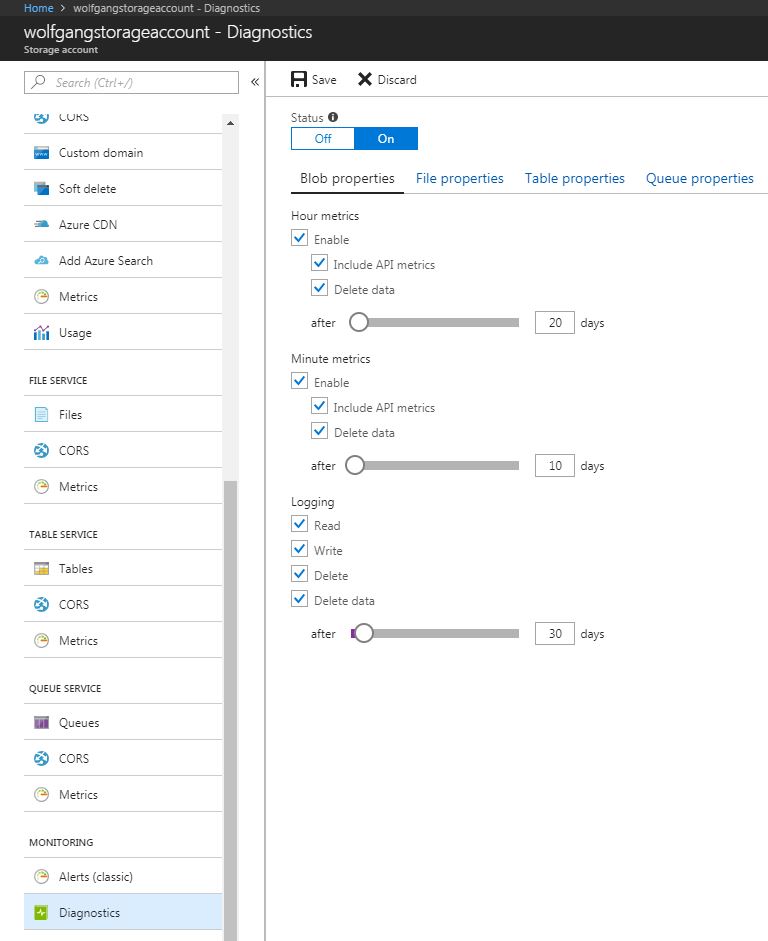
Configure your storage metrics and retention
Analyze storage metrics
Storage Analytics metrics are collected. You can access the tables directly in the Azure portal to analyze and review the metrics. In the next sections, I will talk about different ways to access, review and analyze these metrics.
Monitor storage metrics
The available metrics in the Azure portal include total requests, total egress, average latency, and availability.
To monitor metrics, follow these steps:
- In the Azure portal, go to your storage account and select Metrics under the Blob, File, Table or Queue Service menu.
- On the metrics blade, you can see graphs for the previously mentioned metrics.
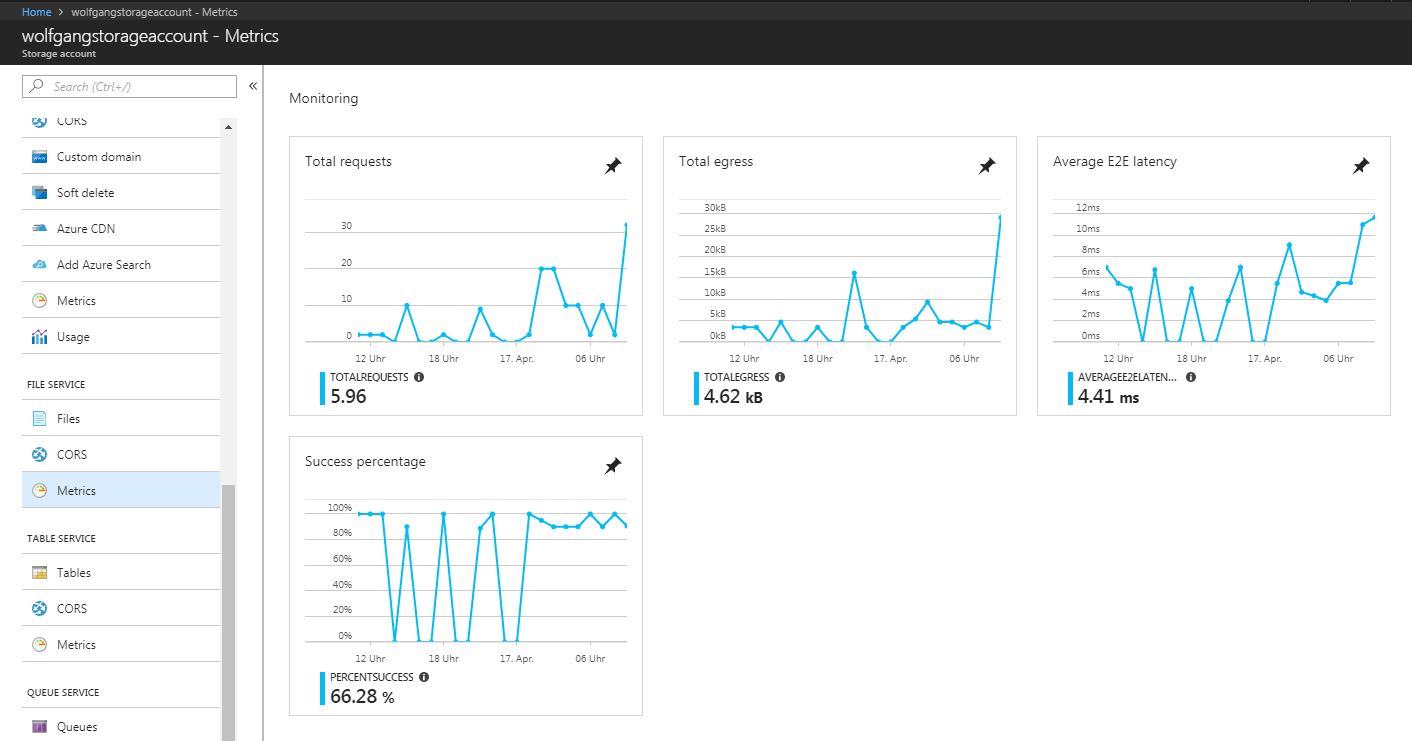
Metric graphs
- Click on a graph to see additional details and to modify it.

View the details of a metric and modify the graph
Configure Storage Analytics Logging
Storage Analytics Logging provides details about successful and failed requests to each storage service. By default, storage logging is not enabled, but you can enable it using the management portal, PowerShell or by calling the management API directly.
When you configure Storage Analytics Logging for a storage account, a blob named $logs is automatically created to store the output of the logs. You can log any or all of the Blob, Table, or Queue service logs are created only for those services that have activity, so you will not be charged if you enable logging for a service that has no request. The logs are stored as block blobs as requests are logged and are periodically committed so that they are available as blobs.
After you enabled Storage Analytics, the log container cannot be deleted. However, the contents of the log container can be deleted.
Duplicate log entries may be present within the same hour. You can use the RequestId and operation number to uniquely identify an entry to filter duplicates.
Analyze logs
Logs are stored as block blobs in delimited text format. You can download logs for review and analysis using any tool compatible with that format. Within the logs, you will find entries for authenticated and anonymous requests.
Logs include status messages and operation logs.
Finding your logs
When storage logging is configured, log data is saved to blobs in the $logs container created for your storage account. You can’t see this container by listing containers, but you can navigate directly to the container to access, view, or download the logs.
To navigate to the $logs container, use a link following this convention: https://
View logs with Excel
To view logs in Excel, follow these steps:
- Open Excel, and on the Data menu, click From Text.
- Find the log file and click Import.
- During the import, select Delimited format, Semicolon as the only delimiter, and Double-Quote(“) as the text qualifier.
After you loaded your logs into Excel, you can analyze and gather information such as:
- Number of requests from a specific IP range
- Which tables or containers are being accessed and the frequency of those requests
- Slow requests
- How many times a particular blob is being accessed with an SAS URL
- Details to assist in investigating network errors
Conclusion
In this post, I talked about creating an SAS token to give access with specific permissions to users and how stored access policies can be created with these tokens. Then, I explained how to regenerate the keys of your storage account and how to enable CORS.
In the second part, I talked about how to enable monitoring and logging for your storage account and how to view and analyze these logs in the Azure portal and with Excel.
For more information about the 70-532 exam get the Exam Ref book from Microsoft and continue reading my blog posts. I am covering all topics needed to pass the exam. You can find an overview of all posts related to the 70-532 exam here.
Comments powered by Disqus.