

In Azure, it is possible to scale Azure Web Apps or Virtual Machines by increasing the size or the count of running instances. Azure also supports auto-scaling on the instance count. In this post, first I will talk about the difference between scale out and scale up. Then I will show how ARM VM Scale Sets are deployed and what they are used for and how to configure them for auto-scale.
Scale up vs. scale out
Scaling a system means changing its available resources and performance. The advantage is that you can easily scale up or scale out a system if you need more performance and scale down or scale in when you don’t need it anymore so you can keep your costs low and save money.
Scale up and scale down
Scaling up and down means changing the size of your VM. You can change the following components of your VM:
- HDD or SSD size
- IOPS (Input/output operations per second)
- The number of CPU cores
- The amount of RAM
- Network performance
Scaling up and down a VM using the Portal
- In the Azure Portal go to your VM (Virtual Machines and then click the VM you want to scale).
- Select Size under the Settings menu.
- This opens the Choose a size blade which you already know from creating the VM. Select the new size.
- Click Select to scale your VM.
Scaling up and down a VM using PowerShell
You can also scale your VM by using PowerShell. First check which VM sizes are available in a specific region by using Get-AzureRmVmSize -Location “Westeurope” | Sort-Object Name |
ft Name, NumberOfCores, MemoryInMB, MaxDataDiskCount -AutoSize.

Get all available VM sizes of a region in PowerShell
If you want to check another location than westeurope, change westeurope to your desired location.
Next put your Resource group, VM name and new VM size into variables. Then use Update-AzureRmVM -ResourceGroupName $ResourceGroupName -VM $VMToScale to update your VM to the desired size.

Scale your VM using PowerShell
The scaling process takes a couple of minutes. You get the confirmation after it is finished.
Scale out and scale in
Scaling out and scaling in means changing the number of VMs on which your software runs. This means if you need more performance, you start additional VMs and have a Load Balancer distributing the requests to all VMs. Scaling out and scaling in is more common than scaling up because you can scale almost indefinitely. If you need way more performance, you just spin up another 1000 VMs. It is harder (or even impossible) and more expensive to increase the CPU cores to 1000 or ram to 5 TB. Scaling out VMs can be achieved with ARM VM Scale Sets which I will describe in the next section.
ARM VM Scale Sets (AVSS)
To scale out a VM, Azure deploys a VM Scale Set which contains identical copies of your ARM VM. To scale in, Azure removes these deployed instances. Each VM within the Scale Set has the same size and pricing tier.
There are some differences between the VMS in the Scale Set and standalone VMs:
- Every VM must be identical to the other ones in the VM. Standalone VMs can vary from each other
- Scale Sets support overprovisioning during the scale out event. This means that Azure deploys more VMs than configured and when the requested amount is running, Azure deletes the additional VM. This feature reduces the deployment time and increases the performance of your application. Furthermore, you are not charged for the additional VMs.
- Scale Sets can roll out upgrades to all VMs within the Scale Set using upgrade policies. Standalone VMs have to orchestrate the update themselves.
- The Azure Autoscale feature can be used only with a Scale Set but not with a standalone VM.
VM Scale Set capacity
The maximum number of VMs inside a Scale Set is called capacity and depends on three factors:
- Support for multiple placement groups
- The use of managed disks
- If the VM’s use an image from the Marketplace or are created from a custom image
Placement groups are similar to Availability Sets where a placement group is implicitly an Availability Set with five fault domains and five update domains which support up to 100 VMs. When you deploy a Scale Set you can restrict it to only a single placement group. This will limit the capacity of your Scale Set to 100 VMs.You can allow multiple placement groups, the Scale Set can support up to 1,000 VMs.
If you use unmanaged storage, you will be limited to a single placement group which will result in only 100 available VMs for your Scale Set. You can use managed disks to support up to 1,000 VMs.
If you used a custom image to create the VMs in your Scale Set, then the Scale sets support 100 VMs. If you used an image from the Marketplace, the capacity of your Scale Set it 1,000 VMs.
Deploy a Scale Set using the Portal
Deploying a Scale Set is similar to deploying a standalone VM:
- Go to the Marketplace
- Click + New and search for scale sets. Then select Virtual machine scale sets and click Create.
- Provide a name for you Scale Set.
- Select Windows or Linux as your OS.
- Select your Subscription, Resource group, and a Location. The Resource group must be either empty or you must create a new one for your Scale Set.
- Enter a user name and password for Windows or an SSH user name and password or SSH public key for Linux.
- Under the Instances and Load Balancer menu, enter the desired instance count.
- Select the size for the VMs in your Scale Set.
- Enable scaling beyond 100 instances lets you select if you want one or multiple placement groups.
- If you allow multiple placement groups, you can only select managed disks. If not, you can choose between managed and unmanaged.
- Configure the public IP address name which you can use to access your VMs via a Load Balancer. Select Dynamic or Static as your public IP allocation mode and provide a label for your domain name. These options are not available if you allowed multiple placement groups.
- Leave Autoscale disabled.
- Click Create.
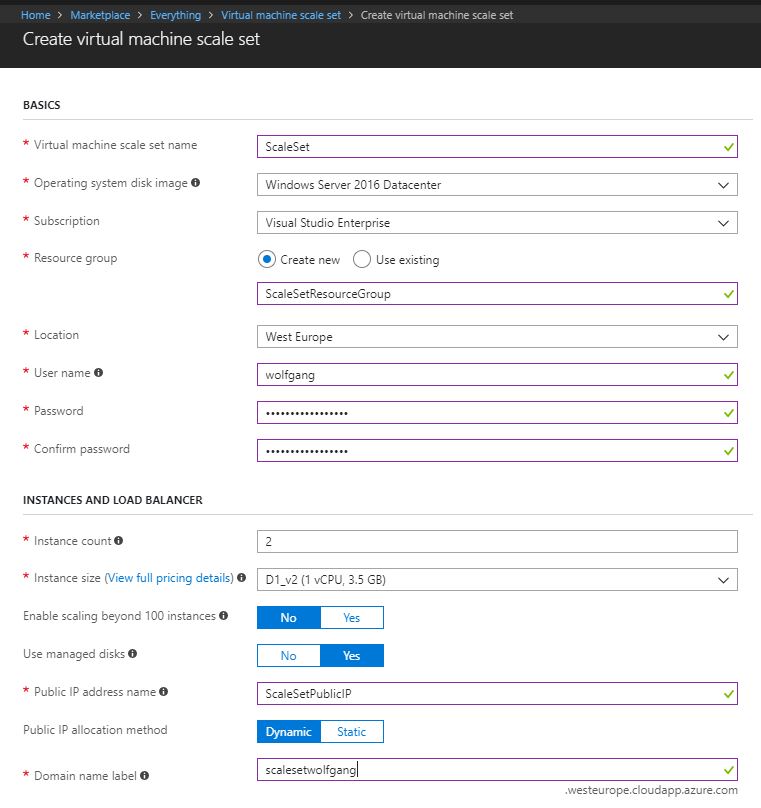
Create a VM Scale Set
Deploy a Scale Set using a custom image
To create a Scale set from a custom image perform the following steps:
- Generalize and capture the image from a standalone VM.
- Create an ARM template:
- Creates a managed image based on the generalized unmanaged disk available in Azure Storage. Your template needs to define a resource of type “Microsoft. Compute/images” that references the VHD image by its URI.
- Configure the Scale Set to use the managed image
- Deploy the ARM template through the Portal, PowerShell or by using the Azure CLI
You can find an example template on GitHub. This script uses Linux instead of Windows as the operating system.
Configure Autoscale
The Autoscale feature enables you to automatically scale your resources based on various metrics. Not only VMs use the Autoscale feature, it is also possible to scale other services such as the Azure Queue or the Service Bus Queue
Configure Autoscale when provisioning a VM Scale Set using the Portal
When you configure Autoscale when provisioning a VM Scale Set, you can only scan against its CPU utilization. The only difference to the provisioning without Autoscale is 12. Follow these steps to configure Autoscale:
- Go to the Marketplace
- Click + New and search for scale sets. Then select Virtual machine scale sets and click Create.
- Provide a name for you Scale Set.
- Select Windows or Linux as your OS.
- Select your Subscription, Resource group, and a Location. The Resource group must be either empty or you must create a new one for your Scale Set.
- Enter a user name and password for Windows or an SSH user name and password or SSH public key for Linux.
- Under the Instances and Load Balancer menu, enter the desired instance count.
- Select the size for the VMs in your Scale Set.
- Enable scaling beyond 100 instances lets you select if you want one or multiple placement groups.
- If you allow multiple placement groups, you can only select managed disks. If not, you can choose between managed and unmanaged.
- Configure the public IP address name which you can use to access your VMs via a Load Balancer. Select Dynamic or Static as your public IP allocation mode and provide a label for your domain name. These options are not available if you allowed multiple placement groups.
- In the Autoscale property group, select enable Autoscale. Then provide the desired VM instance count ranges, the scale out or scale in CPU thresholds and instance counts to scale out or scale in by.
- Click Create.

Enable Autoscale during provisioning of a VM Scale Set
As already said, these steps are basically the same as when setting up a VM Scale Set without Autoscale. The next section should be more interesting when I configure Autoscale for an existing Scale Set.
Configure Autoscale on an existing VM Scale Set using the Portal
After your Scale Set is deployed, you can add Autoscale and scale against a variety of metrics. To set up Autoscale follow these steps:
- In the Portal navigate to your VM Scale Set.
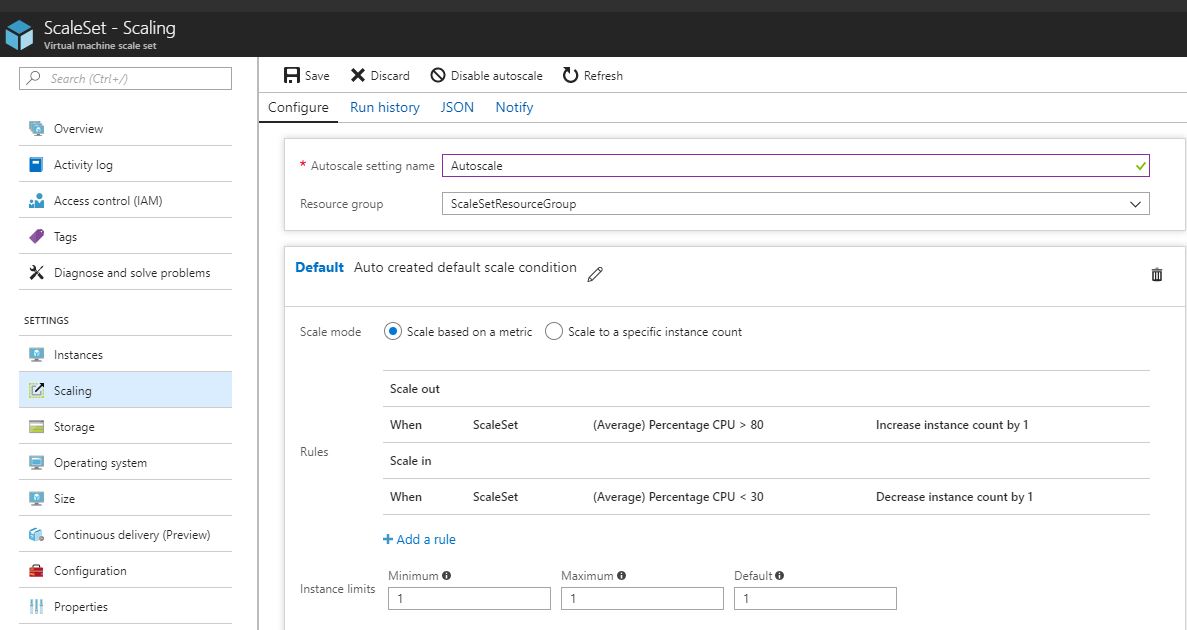
- Under the Settings menu, select Scaling.
- Add the Default Scale Condition or Add A Scale Condition. The default condition will run when no other scale condition match. For example, the Default Scale Condition checks the CPU Usage and if it’s above a certain threshold, it starts additional instances. The Scale Condition could be a scheduled scaling where you start new instances in the morning on workdays and shut them down on the evening.
- Specify if you want to scale based on a metric or scale to a specific instance count.
Click on +Add a rule to add scaling rule. To scale out select within the rule to increase your instance count and to scale in selected decrease your instance count. Adding a rule should be self-explaining and can be done on a variety of metrics. <div class="col-12 col-sm-10 aligncenter">
![Configure Autoscale for your VM Scale Set]()
Configure Autoscale based on CPU usage for your VM Scale Set
1
</div></li>
- After that add another Scale Condition by clicking on + Add a scale condition.</ol>
1
2
3
4
5
6
7
8
9
10
11
12
13
14
15
Select Scale to a specific instance count and set the instance count to 5. Then select Repeat specific days and select Monday until Friday. If necessary change the Timezone and the Start time or End time to meet your requirements.

<div class="col-12 col-sm-10 aligncenter">
  <a href="/assets/img/posts/2018/03/Configure-scheduled-scaling-for-your-VM-Scale-Set.jpg"><img loading="lazy" src="/assets/img/posts/2018/03/Configure-scheduled-scaling-for-your-VM-Scale-Set.jpg" alt="Configure scheduled scaling for your VM Scale Set" /></a>

  <p>
    Configure scheduled scaling for your VM Scale Set
  </p>
</div>

## Conclusion

This post explained the difference between scaling out and scaling up. Then, I showed how to scale up in the Azure Portal and with PowerShell. Afterward, I talked about Scale Sets and how they can be used to scale out VMs and how they can be configured to auto-scale. The Autoscale feature can be used on existing Scale Sets but can also be configured during the provisioning process.

For more information about the 70-532 exam get the <a href="http://amzn.to/2EWNWMF" target="_blank" rel="noopener noreferrer">Exam Ref book from Microsoft</a> and continue reading my blog posts. I am covering all topics needed to pass the exam. You can find an overview of all posts related to the 70-532 exam <a href="/prepared-for-the-70-532-exam/" target="_blank" rel="noopener noreferrer">here</a>.
Comments powered by Disqus.