

In my last post, I talked about writing unit tests using xUnit. Today, I want to go one step further and will talk about writing acceptance tests (ATDD) using xBehave. xBehave is an extension of xUnit for describing tests using natural language. The advantage of the natural language description is that non-technical stakeholder like a manager can read the test report and understand what was tested.
My Setup
For writing tests I use the following NuGet packages and extensions:
- xUnit for unit testing
- xBehave for acceptance tests
- FluentAssertions for more readable assertions
- FakeItEasy to create fake objects
- xUnit Resharper Extension for xUnit shortcuts in Visual Studio
- xunit.runner.visualstudio for running the xBehave tests
To start, I use the code of my last demo which can be found on GitHub.
Execute tests with xBehave
A test in xBehave always has the attribute Scenario. As previously mentioned, xBehave describes the tests using natural language. The default describing patter is Given, When, Then. Other patterns are possible like the classic Arrange, Act, Assert or xSpec style with Establish, Because, It. You could even extend xBehave and use your own attribute name and vocabulary. If you have more than one operation for the same, you can combine them with And, for example, “Given an employee” “And another employee”.
Given
In the Given or Arrange phase, you set up all the objects you need to run your test. In my example test, I only need one employee object, You could set up several objects and combine them with And.

Setting up two employee objects for the tests
When
In the When or Act phase, you call the methods, you want to test. In my example, I add the hours worked during the week to my employee.

Executing a method with my test object
Then
In the Then or Assert phase, you check if the value or result is what you expected. In my example, I check if the salary of the employee has the value I expect.

Evaluate the result of the previous operation
Repeating steps
You can always return to a previous phase. For example, after the salary check from above, you can have another method call with when and then another assert with then.
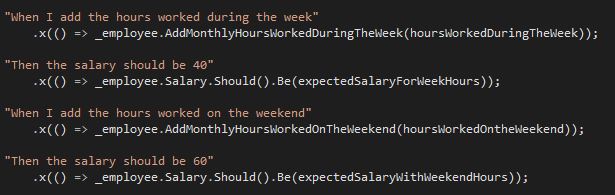
Repeating testing steps
Executing code before the test
In xUnit, the constructor of the class is called before a test is executed. xBehave is very similar, but instead of the constructor, it calls the method with the Background attribute. Usually, the method is also called Background but you can choose whatever name fits best for you.
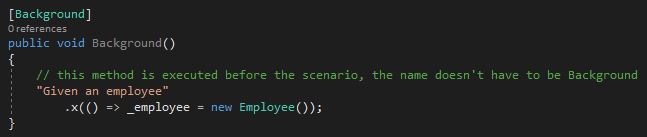
Setting up code before the test execution
Adding parameters to your test
In xBehave you can add parameters to your test with the parameter Example. It works the same way as InlindeData in xUnit. You add values and then have matching parameters in the method signature.

Add parameters to your test
Instead of Example, you can use any attribute which inherits from DataAttribute, for example, MemberData.
Variables inside your test
If you want to assign a value to a variable within your test, you can pass this variable as a parameter. Each parameter which does not have a corresponding example value (based purely on the number of values/parameters) continues to have its default value passed (null for reference types and zero values for value types).

Adding a variable as a parameter to be used in the test
Skipping a scenario
To exclude a scenario from execution, you can apply the skip attribute and provide a message. It works the same way as in xUnit.
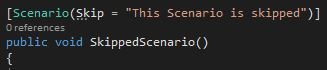
Skipping a scenario
Faking objects and calls within the test
You can set up fake objects and fake calls the same way as in xUnit, using a faking framework like FakeItEasy.
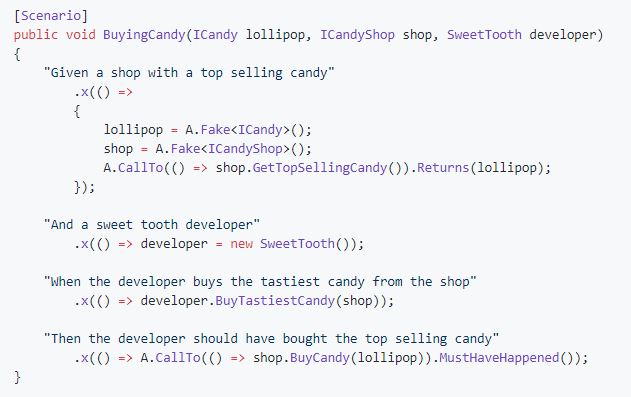
Faking objects inside the test (Source xBehave)
Teardown
If your code needs some cleanup after execution, xBehave provides you with the Teardown method. Provide a delegate to the Teardown method and xBehave will execute your method after the test was run or if an exception occured. On the following screenshot, you can see that in the Teardown method, the employee object calls the Destroy method which does whatever is necessary to clean up the employee object.
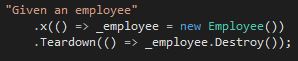
Teardown an object
Conclusion
In this post, I gave a quick overview of xBehave and explained how to set up your scenarios and how to clean up afterward.
You can find the code of my demo on GitHub.
Comments powered by Disqus.