
Azure Storage provides more functionality than just attaching data disks to your VM. In this post, I will talk about creating a file storage account, how to create and access a file share using PowerShell and C# and how to enable caching for your disks.
Plan for storage capacity
VMs in Azure have a local temp drive (D: on Windows and \dev\sdb1 on Linux) and a system disk. The disks are saved as Blob in Azure Storage. This means that this Blob governs the performance and the capacity of the disk. There are two factors when it comes to storage performance and capacity:
- Is the disk standard (HDD) or premium (SSD)?
- Is the disk managed or unmanaged?
The difference between managed and unmanaged is that unmanaged disks require the creation of an Azure Storage Account in your subscription whereas managed disks manage the Storage Account for you. This means that you only need to specify the size and type of your disk and Azure manages the rest for you. The main advantage of using managed disks is that the Storage Account does not limit the disk. See the following table with the differences between standard and premium managed and unmanaged disks:
Comparison of Standard and Premium disks (Source)
| Feature | Standard (unmanaged) | Standard (managed) | Premium (unmanaged) | Premium (managed) |
| Max IOPS for storage account | 20k IOPS | N/A | 60k -127.5k IOPS | N/A |
| Max bandwidth for storage account | N/A | N/A | 50 Gbps | N/A |
| Max storage capacity per storage account | 500 TB | N/A | 35 TB | N/A |
| Max IOPS per VM | Depends on VM size | Depends on VM size | Depends on VM size | Depends on VM size |
| Max throughput per VM | Depends on VM size | Depends on VM size | Depends on VM size | Depends on VM size |
| Max disk size | 4TB | 32GB – 4TB | 32GB – 4TB | 32GB – 4TB |
| Max 8 KB IOPS per disk | 300 – 500 IOPS | 500 IOPS | 500 – 7,500 IOPS | 120 – 7,500 IOPS |
| Max throughput per disk | 60 MB/s | 60 MB/s | 100 MB/s – 250 MB/s | 25 MB/s – 250 MB/s |
IOPS is a unit of measure which counts the number of input and output operations per second. Usually, Azure VMs allow the number of disks you can attach is twice the number of CPU cores of your VM.
Configure Storage Pools
Before you can configure a storage pool, you have to add disks to your VM.
Create new disks for your VM
Follow these steps:
- Open your VM in the Azure Portal.
- Under the Settings menu click Disks.
- On the Disks blade, click + Add data disk.
- In the drop-down menu under Name select Create disk.
- On the Create managed disk blade provide a Name, Resource group and the Account type (SSD or HDD).
- As Source type select None (empty disk) and provide your desired size.
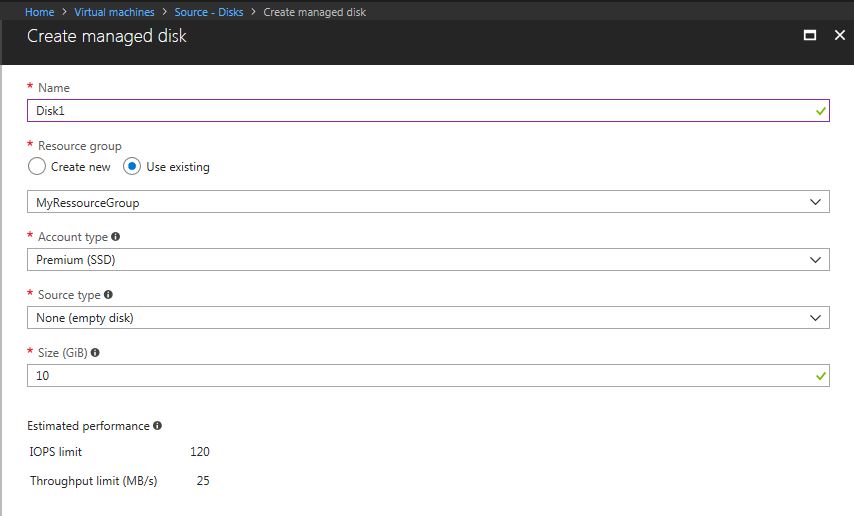
Create a new disk for your VM
- Click Create.
- You can add more disks or click Save on the top of the blade.
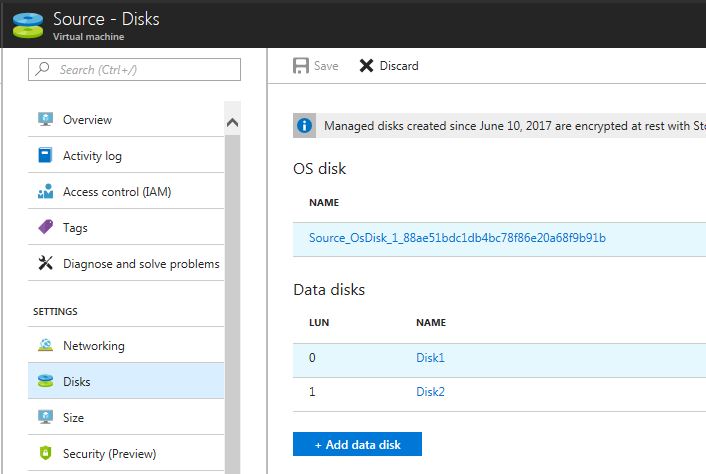
Adding disks to your VM
Create a Storage Pool
Storage Pools enable you to group together a set of disks and then create a volume from the available aggregate capacity. To do that follow these steps:
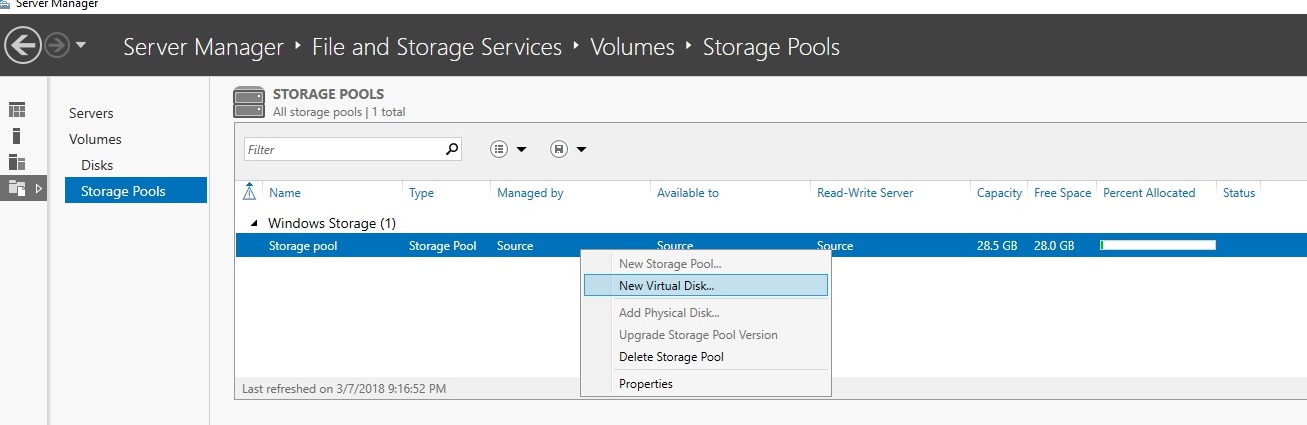
- Connect to your Windows VM using RDP.
- Open the Server Manager.
- Click on File and Storage Services and then Storage Pools.

Adding a new Storage Pool to your VM
- Provide a name for your Storage Pool and click Next.
- Select all disks which you want to add to the storage pool and click Next.

Add the physical disks to the Storage Pool
- Click Create and then Close to create the storage pool.
Create a new Virtual Disk
- After the storage pool is created, right-click on it and select New Virtual Disk…
Create a new virtual disk
- Select the storage pool you just created and click OK.
- In the wizard enter a name for the virtual disk and click Next twice.
- Select Simple as your layout and click Next. You don’t need mirroring because Azure already replicates your data three times.
- For the provisioning select and click Next.
- Select Maximum size, so that the new virtual disk uses the complete capacity of the storage pool and click Next.
- In the Confirm selections window, click Create.
- After the new volume is created click Next on the first page of the wizard.
- Select the disk you just created and click Next.
- Leave the volume size as it is and click Next.
- Leave Assign to Drive letter selected and optionally change the drive letter, then click Next.
- In the last window, click Create and then Close to finish the process.
- After the wizard is completed, open the Windows Explorer and you can see your new drive.
The Windows Explorer with the new mapped disk
You can increase the IOPS and total storage capacity if you use multiple blobs for your disks.
For Linux, you have to use the Logical Volume Manager to create the volume.
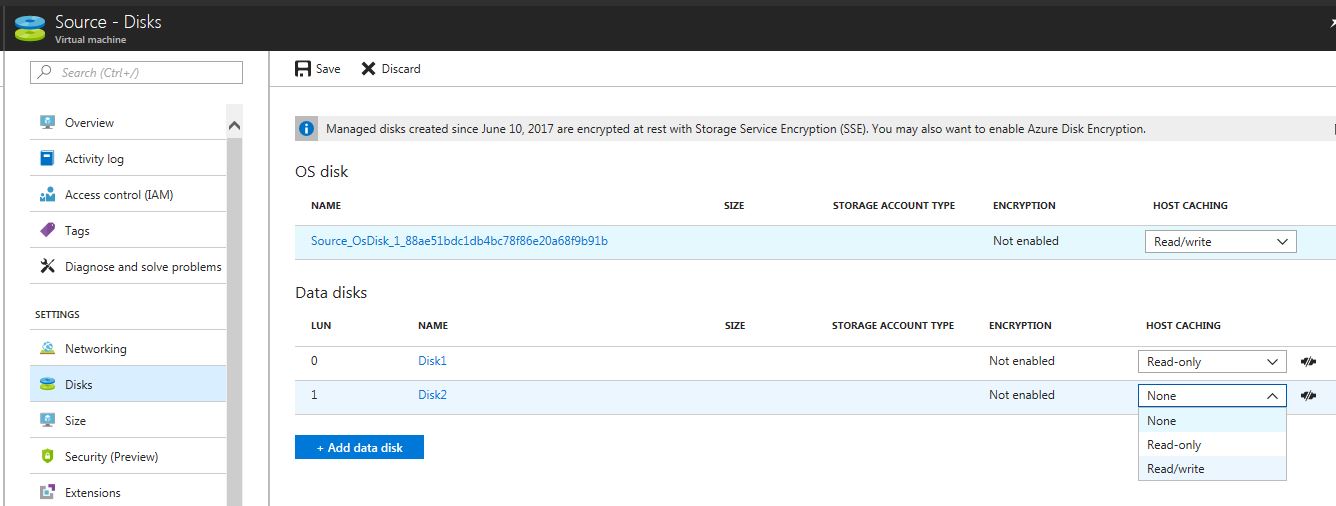
Configure disk caching
Each disk you attach to your VM has a local cache which can improve the performance of read and write operations. This cache is outside your VM (it’s on the host of your VM) and uses a combination of memory and disks on the host. There are three caching options available:
- None: No caching
- Read-Only: The cache is only used for read operations. If the needed data is not found in the cache, it will be loaded into it form the Azure Storage. Write operations go directly into the Azure Storage.
- Read/Write: The cache is used for read and write operations. The write operations will be written into Azure Storage later.
The default options are Read/Write for the operating system disk and Read-Only for the data disk. Data disks can turn off caching, operating system disk can’t. The reason for this behavior is that Azure Storage can provide better performance for random I/Os than the local disk. The big advantage of caching is obviously the better performance but also minimizes caching your costs because you don’t pay anything if you don’t access your Storage Account.
Enable disk caching
To enable caching for your disk follow these steps:
- Open your VM in the Azure Portal.
- Under the Settings menu, select Disks.
- Select Edit on the Disks blade.
- Select the Host Caching drop-down and set it to the desired configuration.
Enable disk caching
- Click Save.
Enable geo-replication
With geo-replication, you can copy your data into other data centers, even in other regions all around the world. Additionally to geo-replication, Azure created three copies of your data within the data center where they reside. Keep in mind that geo-replication is not synchronized across blob files. To save money and keep your data safe configure your VM disks to use locally redundant replication.
Configure shared storage using Azure File storage
Azure File storage enables your VMs to access files using a shared location within the same region your VMs. The VMs don’t even have to be in the same subscription or storage account than your Azure File storage. It only has to be in the same region. It can be compared with a network drive since you can also map it like a normal network drive. Common scenarios are:
- Support applications which need a file share
- Centralize storage for logs or crash dumps
- Provide access to shared application settings
To create an Azure File storage you need an Azure Storage account. The access is controlled by the storage account name and a key. As long as your VM and the File storage are in the same region, the VM can access the storage using the storage credentials.
Each share is an SMB file share and can contain an unlimited number of directories. The maximum file size is one terabyte and the maximum size of a share is five terabytes. A share has a maximum performance of 1,000 IOPS and a throughput of 60 MB/s.
Creating a file share using Azure Storage
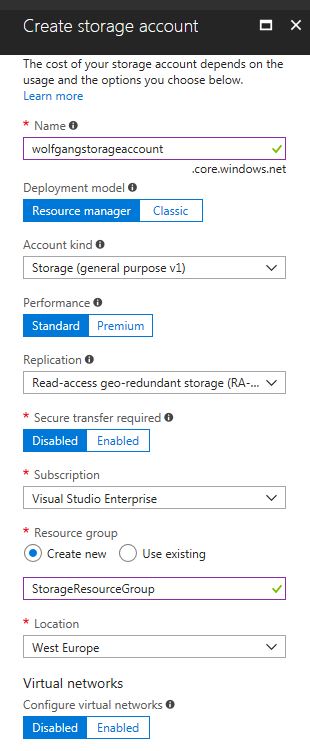
Before you can create a file share, you need to create a storage account. To do that follow these steps:
- Click on Storage accounts in the Azure Portal.
- Click + Add on the top of the blade.
- On the Create storage account blade provide a name, Subscription, Resource group and Location. Enable Secure transfer required if you want to use https only.
Create a new storage account
- Click Create.
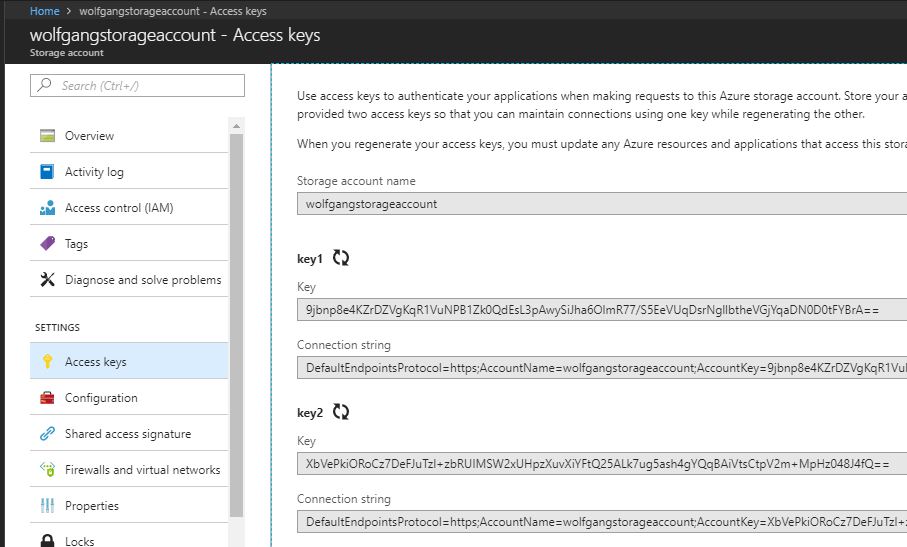
With the storage account created, I can use PowerShell to create a file share. To do that I need the storage account name and the storage account key. To get this information open your storage account and click on Access keys under the Settings menu.
Keys for the storage account
To create a file share using PowerShell use: $context = New-AzureStorageContext -Storage-AccountName “YourStorageAccountName” and then New-AzureStorageShare “YourShareName” -Context $context. The share name must be a valid DNS name, lowercase and between 3 and 63 characters long.

Create a file share using PowerShell
Mounting the file share
To access the share follow these steps:
- Connect to your VM via RDP.
- Open PowerShell or the command promp.
- Enter command to add your Azure Storage account credentials to the Windows Credentials Manager: cmdkey /add:
.file.core.windows.net /user: /pass: . - Replace the values within <> with your credentials. You can find your credentials in the Azure Portal in your Storage Account.

Add the Azure Storage account credentials to the Windows Credentials Manager
- To mount the file share to a drive letter use net use z: \\
.file.core.windows.net\ . For example net use z: \\ .file.core.windows.net\ . Replace the values within <> with your storage account name and share name </li> </ol> ![Map the file to drive letter Z]()
Map the file to drive letter Z
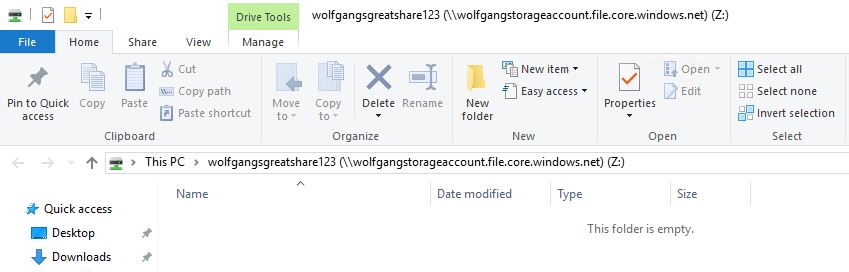
- Now you can find the file share in the Windows Explorer.
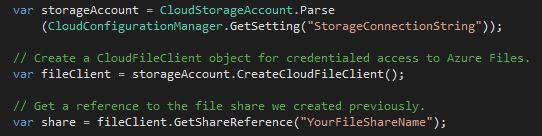
### Access the file share using PowerShell You can upload or download file to and from the file share using PowerShell. Before I start, I uploaded a text file to the file share and renamed it to fileshare.txt 1. To work on your storage account, you have to get its context using $variable = New-AzureStorageContext -StorageAccountName![The mapped file share]()
The mapped file share
-StorageAccountKey . Replace the values within <> with your storage account name and your key. 2. To download a file to your current directory use Get-AzureStorageFileContent -ShareName -Path -Context $variable. ### Access the file share using C# For this example, I create a new C# console application. Then follow these steps to access the file share: 1. Install the WindowsAzure.Storage and the WindowsAzure.ConfigurationManager NuGet Packages. 2. Add your storage account credentials to the app.config file.![Download a file from your file share using PowerShell]()
Download a file from your file share using PowerShell
![Add the storage connection string to App.config]()
Add the storage connection string to App.config
- Connect to your storage account and get the reference from the file share.
![Connect to your storage account and get the reference from the file share]()
Connect to your storage account and get the reference from the file share
- Get a reference to your root directory and to the file you want to download.
![Get a reference to your root directory and to the file you want to download]()
Get a reference to your root directory and to the file you want to download
- Download the file to your computer.
![Download the file to your computer]()
Download the file to your computer
- You can also upload a file by getting a reference to your directory and then upload the file using UploadText
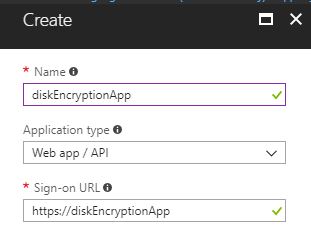
You have to replace my placeholder strings with valid values for a filename or share name. My example project is on GitHub. ## **Disk encryption** Before you can encrypt the disk of your VM, you have to do some set up steps. ### **Set up** To set up your Azure environment to encrypt the disks of your VMs, you have to do an application registration and create a Key vault. #### Azure Active Directory App Registration To register an app in the AAD follow these steps: 1. In the Azure Portal go to the Azure Active Directory. 2. Select App registrations under the Manage menu and click on + New application registration. 3. On the Create blade, provide a name and Sign-on URL and click on Create.![Upload a file to your file share]()
Upload a file to your file share
![Create an application registration]()
Create an application registration
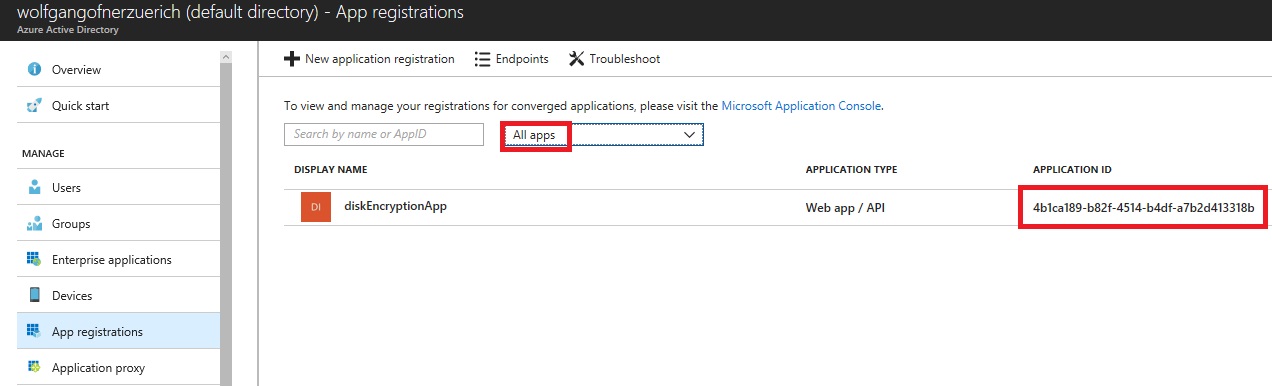
- On the App registrations blade, select All apps from the drop-down list on the top and copy the Application Id of your newly created app. This id is the AAD client id which I will need later.
![Get the AAD client Id]()
Get the AAD client Id
- Click on your application and then select Settings.
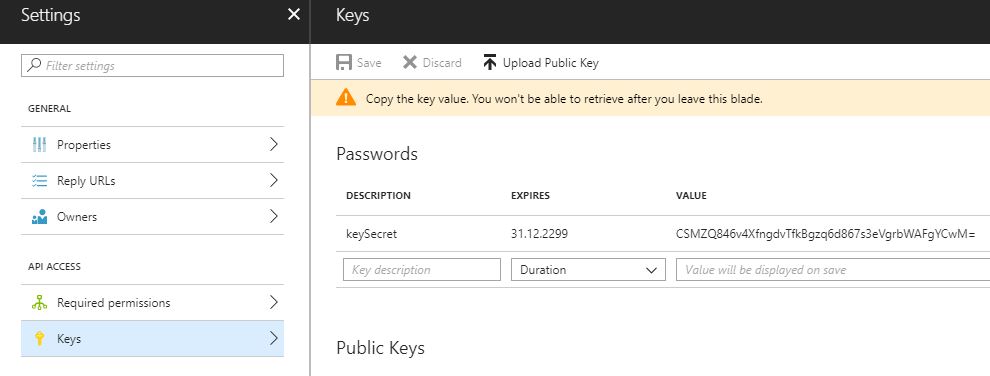
- Select Key under the Api Access.
- Enter a description and set the expire that for the key on the Keys blade.
- Click Save. After the key is created, the hidden key value is display. It is important that you copy the key because after you close the window, it won’t be displayed again. This key is the client secret for later.
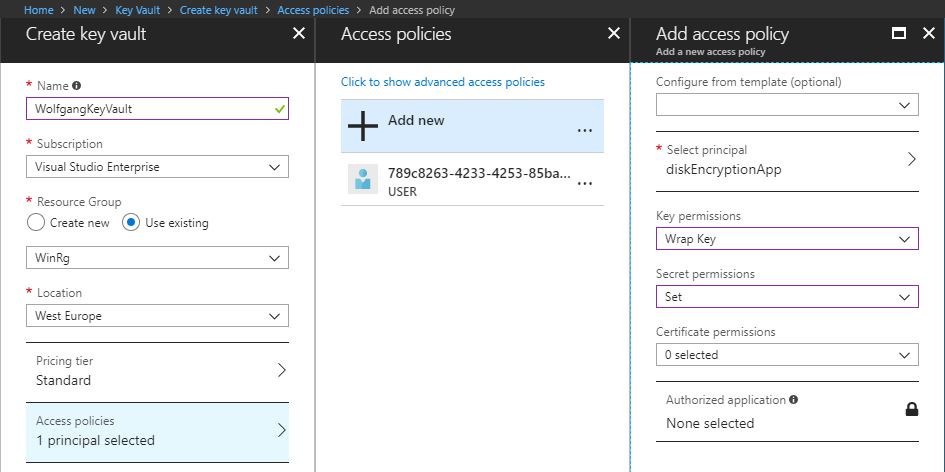
#### Create a Key vault 1. The next step is to create a Key vault. To do that click on All services and search for Key vaults. 2. On the Key vaults blade, click on + add. 3. Provide a Name, Subscription, Resource Group and Location on the Create key vault blade. 4. Click on Access policies and the on + Add new. 5. On the Add access policy blade, click on Select principal and search for your previously create application registration. 6. In the Key permissions drop-down list, select Wrap Key.![Create a client secret]()
Create a client secret
![Create a new key vault with the previously created application registration]()
Create a new key vault with the previously created application registration
- In the Secret permission drop-down list, select Set.
- Click OK twice and then Create
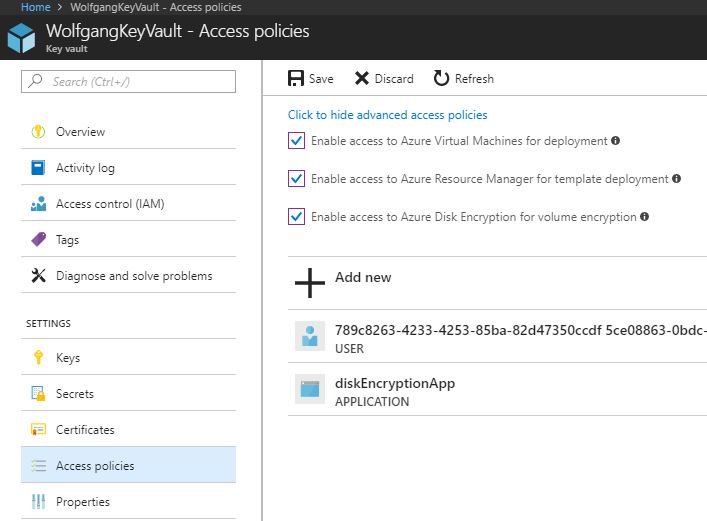
- After your Key vault is created, click on Access policies under the Settings menu.
- On the Access policies blade, click on Click to show advanced access policies and select all three checkboxes.
![Enable all access policies]()
Enable all access policies
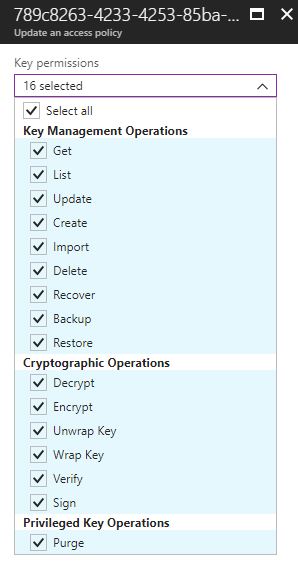
- Still on the Access policies blade, click on your User (mine starts with 789c… on the screenshot above).
- In the Key permissions drop-down list, check Select all and click OK.
After all these steps, you can encrypt your Windows VM with Powershell, CLI or with a template and your Linux VM with CLI or with a template. ### **Windows** To demonstrate how to encrypt a Windows VM, I created a new Windows Server 2016 VM with the name WinServer in the resource group WinRg. #### **Powershell** To encrypt your Windows VM using Powershell follow these steps: 1. Login to your Azure account with Login-AzureRmAccount. 2. Select your Subscription with Select-AzureRmSubscription -SubscriptionName “YourSubscriptionName”. 3. $resourceGroupName = “YourResourceGroup” 4. $vmName = “YourVmName” 5. $clientID = “YourAadClientId” (you copied that value during the setup process) 6. $clientSecret = “YourClientSecret” (you copied that value during the set up process) 7. $keyVaultName = “YourKeyVaultName” 8. $keyVault = Get-AzureRmKeyVault -VaultName $keyVaultName -ResourceGroupName $resourceGroupName 9. $diskEncryptionKeyVaultUrl = $keyVault.VaultUri 10. $keyVaultResourceId = $keyVault.ResourceId 11. Set-AzureRmKeyVaultAccessPolicy -VaultName $keyVaultName -ResourceGroupName $resourceGroupName -EnabledForDiskEncryption 12. Set-AzureRmVMDiskEncryptionExtension -ResourceGroupName $resourceGroupName -VMName $vmName -AadClientID $clientID -AadClientSecret $clientSecret -DiskEncryptionKeyVaultUrl $diskEncryptionKeyVaultUrl -DiskEncryptionKeyVaultId $keyVaultResourceId 13. This starts the Encryption and takes around 10 -15 minutes. After the encryption is done, you can check, if your disks are encrypted with Get-AzureRmVMDiskEncryptionStatus -ResourceGroupName $resourceGroupName -VMName $vmName![Give your user all key permissions]()
Give your user all key permissions
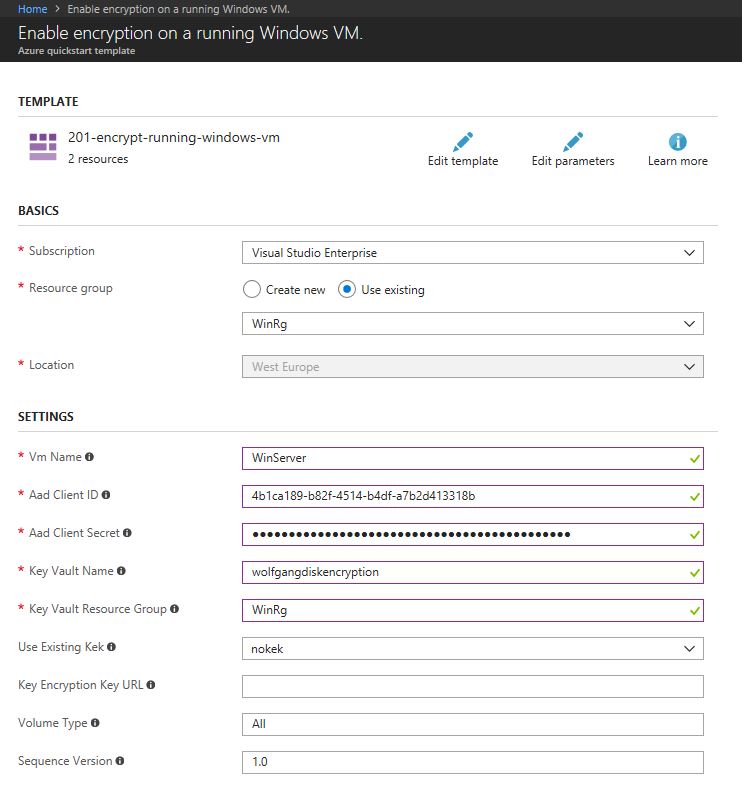
#### **Template** Additionally to the PowerShell encryption can you encrypt your VM with a template. Go to GitHub and then click on deploy to Azure. This opens the template in Azure. Enter the following values:![Encrypt a Windows VM using PowerShell]()
Encrypt a Windows VM using PowerShell
The Aad Client ID and Aad Client Secret are the values you copied during the setup process. After you entered your values, accept the terms and conditions and click on Purchase. ### **Linux** To demonstrate how to encrypt a Windows VM, I created a new Kali Linux VM with the name Linux in the resource group WinRg. #### **Template** Go to GitHub and then click on deploy to Azure. This opens the template in Azure. Enter the following values:![Enable encryption on a running Windows VM template]()
Enable encryption on a running Windows VM template
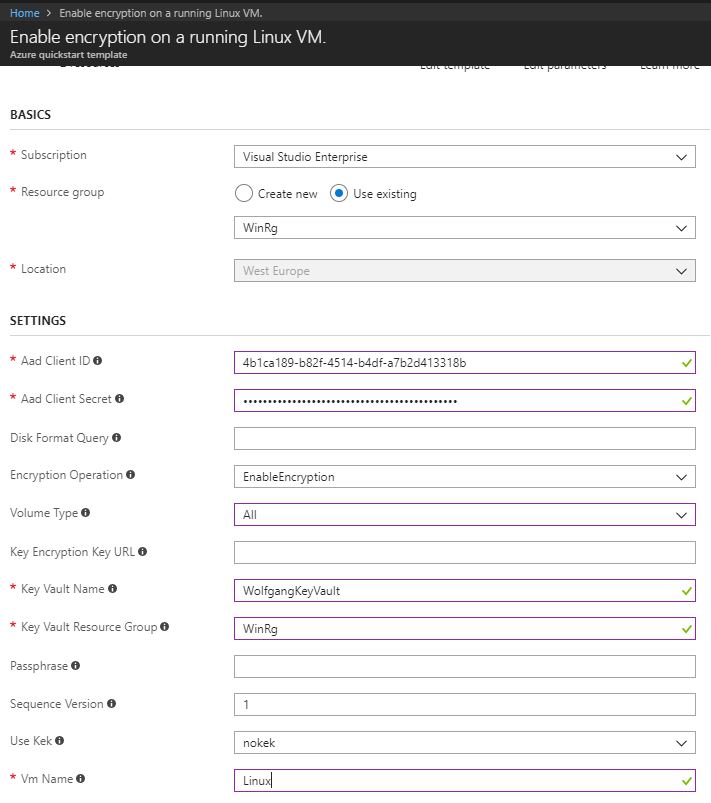
The Aad Client ID and Aad Client Secret are the values you copied during the set up process. After you entered your values, accept the terms and conditions and click on Purchase. **CLI** To encrypt your VM disk with Azure CLI see the documentation. ## StoreSimple The Azure StoreSimple Virtual Array is an integrated storage solution which manages storage tasks between an on-premises virtual array running in a hypervisor and Microsoft Azure cloud storage. It is a cost-effective file server or iSCSI server solution which is well-suited for infrequently accessed archival data. The virtual array supports the SMB and iSCSI protocol. It runs in your existing hypervisor infrastructure and provides tiering to the cloud, cloud backup, fast restore and disaster recovery features. The following table summarizes the most important features (Source):![Create encryption on a running Linux VM with the template]()
Create encryption on a running Linux VM with the template
### Why use StorSimple StorSimple can connect the users and servers to Azure storage in minutes, without making changes to applications. The following table show some benefits of StorSimple Virtual Array (Source):Feature StorSimple Virtual Array Installation requirements Uses virtualization infrastructure (Hyper-V or VMware) Availability Single node Total capacity (including cloud) Up to 64 TB usable capacity per virtual array Local capacity 390 GB to 6.4 TB usable capacity per virtual array (need to provision 500 GB to 8 TB of disk space) Native protocols iSCSI or SMB Recovery time objective (RTO) iSCSI: less than 2 minutes regardless of size Recovery point objective (RPO) Daily backups and on-demand backups Storage tiering Uses heat mapping to determine what data should be tiered in or out Support Virtualization infrastructure supported by the supplier Performance Varies depending on underlying infrastructure Data mobility Can restore to the same device or do item-level recovery (file server) Storage tiers Local hypervisor storage and cloud Share size Tiered: up to 20 TB; locally pinned: up to 2 TB Volume size Tiered: 500 GB to 5 TB; locally pinned: 50 GB to 200 GB, maximum local reservation for tiered volumes is 200 GB. Snapshots Crash consistent Item-level recovery Yes; users can restore from shares For more information see the documentation. ## Conclusion In this post, I talked about storage pools on VMs and how virtual disks are created. Then I talked about enabling geo-replication and disk caching. Next, I showed how to create a file share and how to interact with it using your VM, PowerShell or C# code. After the file share, I explained how to set up disk encryption for your Windows and Linux VMs. The last section talks about what StorSimple is and what benefits it can bring. For more information about the 70-532 exam get the Exam Ref book from Microsoft and continue reading my blog posts. I am covering all topics needed to pass the exam. You can find an overview of all posts related to the 70-532 exam here.Feature Benefit Transparent integration The virtual array supports the iSCSI or the SMB protocol. The data movement between the local tier and the cloud tier is seamless and transparent to the user. Reduced storage costs With StorSimple, you provision sufficient local storage to meet current demands for the most used hot data. As storage needs grow, StorSimple tiers cold data into cost-effective cloud storage. The data is deduplicated and compressed before sending to the cloud to further reduce storage requirements and expense. Simplified storage management StorSimple provides centralized management in the cloud using StorSimple Device Manager to manage multiple devices. Improved disaster recovery and compliance StorSimple facilitates faster disaster recovery by restoring the metadata immediately and restoring the data as needed. This means normal operations can continue with minimal disruption. Data mobility Data tiered to the cloud can be accessed from other sites for recovery and migration purposes. Note that you can restore data only to the original virtual array. However, you use disaster recovery features to restore the entire virtual array to another virtual array.


Comments powered by Disqus.