

Azure Logic Apps is a fully managed iPaaS (integration Platform as Service) that helps you simplify and implement scalable integrations and workflows from the cloud. When you create a Logic App, you start out with a trigger, for example, “When a tweet contains a certain hashtag”, and then you act on that trigger with many combinations of actions, condition logic, and conversions.
There is a huge amount of built-in connectors like Twitter, Office 365, Azure Blob Storage or Salesforce.
Create a Logic App connecting SaaS services
The probably biggest strengths of Logic Apps is its ability to connect a large number of SaaS service to create your own custom workflows. In the following demo, I will connect Twitter with an outlook mailbox to email certain tweets as they arrive.
To create a Logic App, follow these steps:
- In the Azure portal click on +Create a resource, search for Logic App and click Create.
- Provide a name, subscription, resource group and location.
- Click Create.

Create a Logic App
After the Logic App is created, open it to view the Logic Apps Designer. This is where you design or modify your Logic App. You can select from a series of commonly used triggers, or from several templates you can use as a starting point.
Create your own template
Following, I will create a template from scratch:
- Select Blank Logic App under Templates.
- All Logic Apps start with a trigger. Select Twitter from the list.
- Click Sign in to connect Twitter with your account and authorize the Logic App to access your account.
- After you are logged in, enter your search text to return certain tweets (for example #Azure), and select an interval and frequency for how often to check for items.
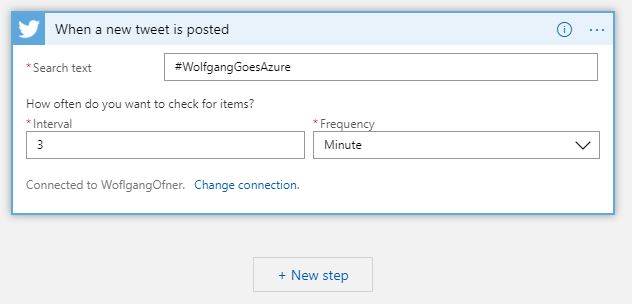
Connect the Logic App with Twitter
- The next step is to add another action by clicking + New step and select Add an action.
- Search for Gmail and select Gmail – send email.
- In the configuration window enter the recipient of the email, a subject, and the body. In the body, you could add for example the name of the person who tweeted and the tweet text.
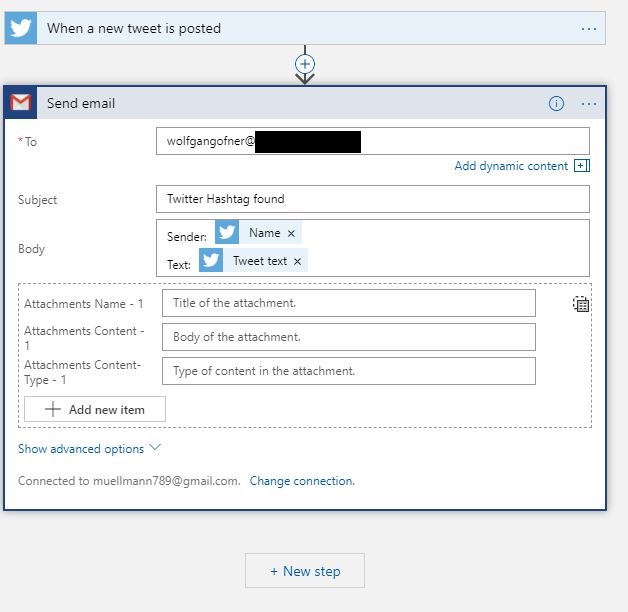
Configure the Gmail connector to send an email
- Save the template.
- You can test it immediately by clicking Run.
- Send a tweet and you should get an email to the configured email.
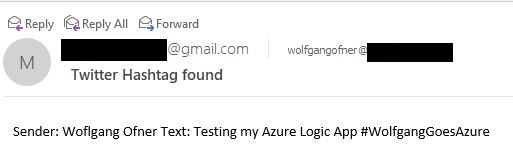
The received email from the Gmail connector
- If you set everything up correctly, you should receive an email.
First, I wanted to use Outlook 365 to send emails but I couldn’t log in although I tried three different accounts. Gmail only worked with the second account I tried. I couldn’t find anything about that on Google nor do I have any idea why it didn’t work.
Create a Logic App with B2B capabilities
Logic Apps support business-to-business (B2B) workflows through the Enterprise Integration pack. This allows organizations to exchange messages electronically, even if they use different protocols and formats. Enterprise integration allows you to store all your artifacts in one place, within your integration account, and secure message through encryption and digital signature.
Create an integration account
To create an integration account, follow these steps:
- In the Azure portal click on +Create a resource, search for Integration Account and click Create.
- Provide a name, subscription, resource group, pricing tier and location. Note that your integration account and Logic App must be in the same location, otherwise you can’t link them.
- Click Create.
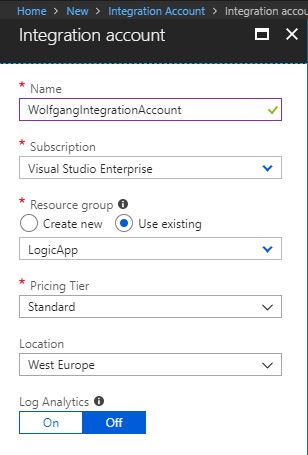
Create a new integration account
Add partners to your integration account
Messages between partners are called agreement. You need at least two partners in your integration account to create an agreement. Your organization must be the host partner, and the other partner(s) are guests. Guest partners can be outside organizations or even a different department in your organization.
To add a partner to your integration account, follow these steps:
- Open your integration account and click on the Partners blade under the Settings menu.
- On the Partners blade click on +Add and provide a name, qualifier, and value to help identify documents that transfer through your apps. As the qualifier, you have to select, AS2Identity, otherwise you can’t create an AS2 agreement in the next section.
- Click OK.
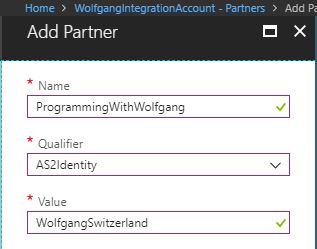
Add a new partner
I added another partner and both are added to the list on the Partners blade.
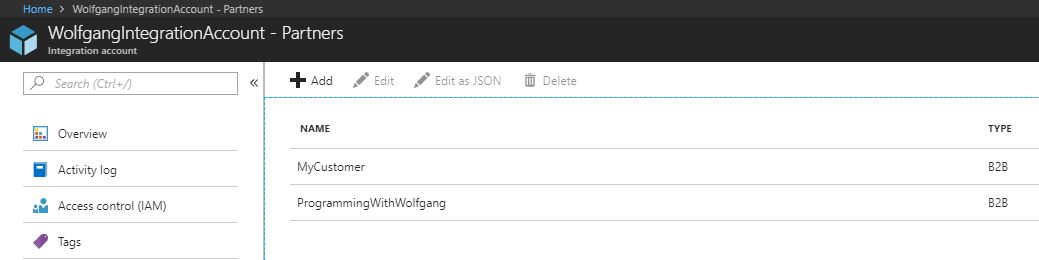
Both partners are listed
Add an agreement
After the partners are associated with the integration account, you have to allow them to communicate using industry standard protocols through agreements. These agreements are based on the type of information exchanged, and through which protocol or standard they will communicate: AS2, X12 or EDIFACT.
To create an AS2 agreement, follow these steps:
- Open your integration account and click on the Agreements blade under the Settings menu.
- On the Agreementsblade click on +Add and provide a name and select AS2 as agreement type.
- Select your previously created host and guest partner and their identity.
- Click OK
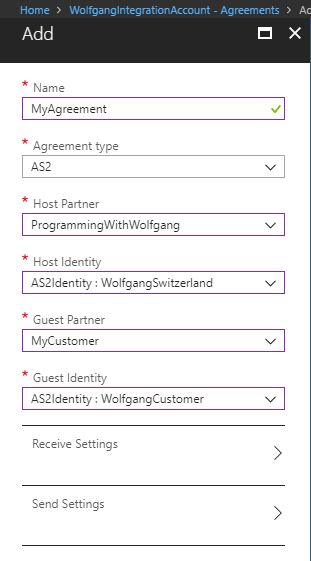
Create a new AS2 agreement
Link your Logic App to your Enterprise Integration account
After the integration account is set up, you can link it with your Logic App to create B2B workflows. As mentioned before, the integration account and Logic App must be in the same region to be linked.
To link them, follow these steps:
- Open your Logic App and click on the Workflow settings blade under the Settings menu.
- On the Workflow settings blade, select your integration account in the “Select an Integration account” drop-down menu.
- Click Save.
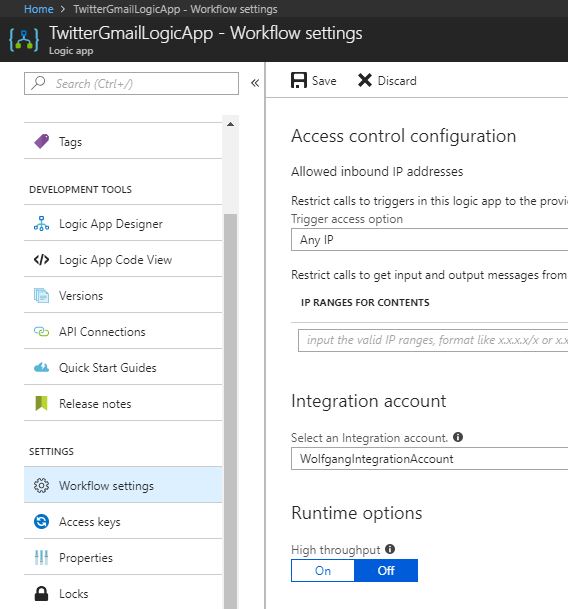
Link your Logic App and integration account
Use B2B features to receive data in Logic Apps
After the Logic App and integration account are linked, you can create a B2B workflow using the Enterprise Integration Pack., following these steps:
- Open your Logic App and click on the Logic App Designer blade under the Development Tools menu.
- On the Logic App Designer click on Blank Logic App under templates.
- Search for http and select Request – When a HTTP request is received.
- Click on + New step, then on Add an action and search for AS2.
- Select AS2 – Decode AS2 message.
- Provide a connection name, select your integration account and click Create.
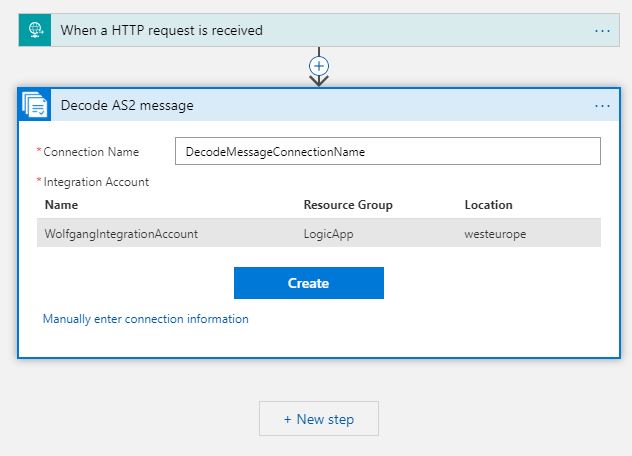
Add the decode AS2 message form
- In the body section select the Body from the HTTP request and as Headers select Headers. If you can’t select Headers, click on the small button on the right to switch to text mode.
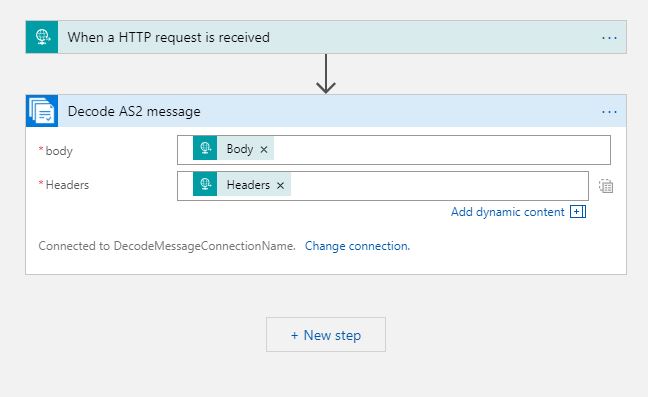
Setting the Decode AS2 Message body and headers information form in the Logic
- Click on + New step, then on Add an action and search for X12.
- Select X12 – Decode X12 Message.
- Enter a connection name, select your integration account and click Create.
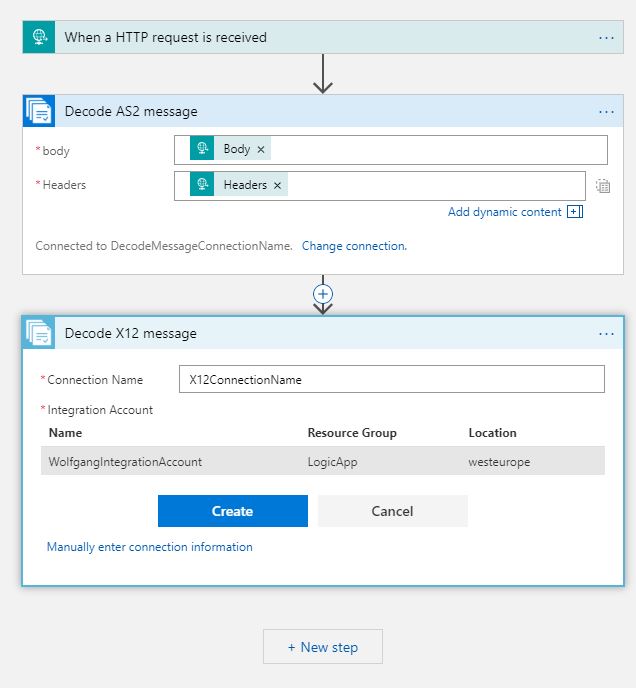
Enter a connection name and select your integration account
- Since the message content is JSON-formated and base64-encoded, you must specify an expression as the input. Enter the following expression in the X12 flat file message to decode textbox: @base64ToString(body(‘Decode_AS2_Message’)?[‘AS2Message’]?[‘Content’])
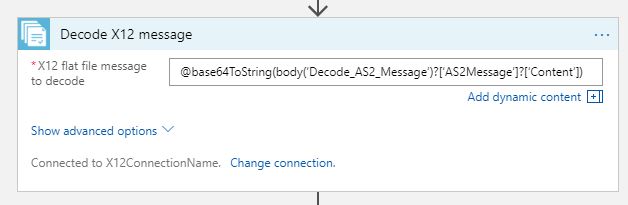
Decode the AS2 message
- Click on + New step, then on Add an action and search for response.
- Select Request – Response.
- Paste @base64ToString(body(‘Decode_AS2_message’)?[‘OutgoingMdn’]?[‘Content’]) into the Body textbox.
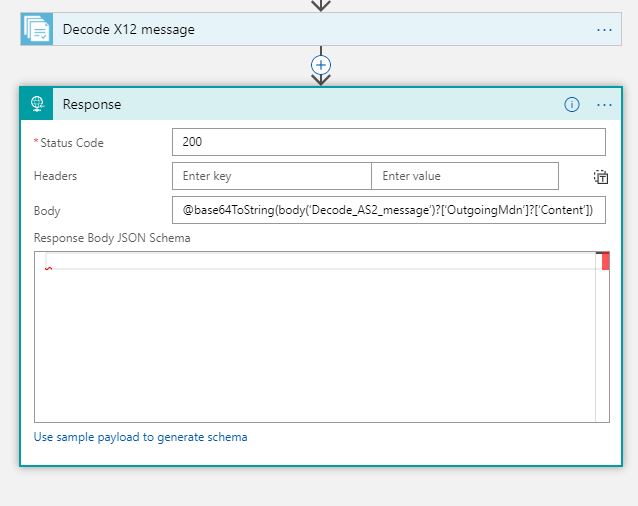
Configure the response
- Click Save. If you configured everything right, your template will be saved, if not you get an error message, which is usually helpful.
Create a Logic App with XML capabilities
Often, businesses send and receive data between organizations in the XML format. Schemas are used to transform data from one format to another. Transforms are also known as maps, which consist of source and target XML schemas. Linking your Logic App with an integration account enables your Logic App to use Enterprise Integration Pack XML capabilities.
The XML features in the Enterprise Integration Pack are:
| XML feature | Description |
| XML validation | XML validation is used to validate incoming and outgoing XML messages against a specific schema. |
| XML transform | XML transform is used to convert data from one format to another. |
| Flat file encoding/decoding | Flat file encoding/decoding is used to encode XML content prior sending or to convert XML content to flat files. |
| XPath | XPath is used to extract specific properties form a message, using an XPath expression. |
Add schemas to your integration account
Since schemas are used to validate and transform XML messages, you must add one or more to your integration account before working with the Enterprise Integration Pack XML feature within your linked logic app.
To add a new schema, follow these steps:
- Open your integration account and select the Schemas blade under the under the Settings menu.
- On the Schemas blade, click +Add.
- Provide a name, select whether it is a small or large file and upload an XSD file. (You can find a sample XSD here)
- Click OK.
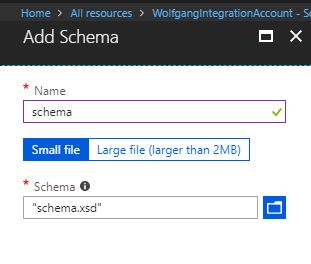
Add a schema to your integration account
Add maps to your Integration Account
If your Logic App should transform data from one format to another one, you have to add a map (schema) first.
To add a new schema, follow these steps:
- Open your integration account and select the Maps blade under the under the Settings menu.
- On the Maps blade, click +Add.
- Enter a name and upload an XSLT file (You can find a sample XSLT here).
- Click OK.

Add a map to your integration account
Add XML capabilities to the linked Logic App
After adding an XML schema and map to the integration account, the application is ready to use the Enterprise Integration Pack’s XML validation, XPath Extract, and Transform XML operations in Logic App.
Follow these steps to use XML capabilities in your Logic App:
- Open the Logic App Designer in your Logic App.
- Select Blank Logic App under Templates.
- Search for http and select Request – When a HTTP request is received.
- Click on + New Step and select Add an action.
- Search for xml and select XML – XML Validation.
- Select Body as Content and the previously uploaded schema
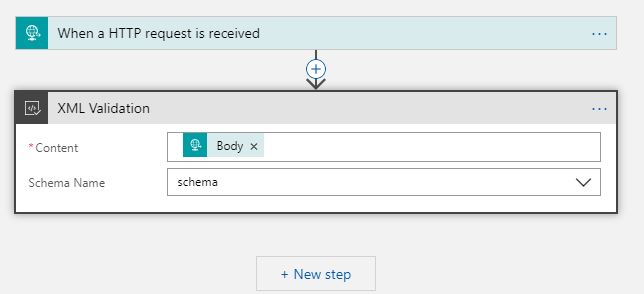
Add XML validation to your Logic App
- Click on + New step and select Add an action.
- Search for xml and select Transform XML – Transform XML.
- Select the HTTP Body as Content and your previously added map.

Add XML transformation to your Logic App
Unfortunately the Azure Portal displayed various errors at this point and Microsoft’s documentation was outdated.
Trigger a Logic App from another app
The most common type of triggers are those that create HTTP endpoints. Triggers based on HTTP endpoints tend to be more widely used due to the simplicity of making REST-based calls from practically any web-enabled development platform.
| Trigger | Description |
| Request | The HTTP endpoint responds to incoming HTTP request to start the Logic App’s workflow in real time. Very versatile, in that it can be called from any web-based application external webhook events, even from another Logic App with a request and response action. |
| HTTP Webhook | A webhook is an event-based trigger that does not rely on polling for new items. Register subscribe and unsubscribe methods with a callback URL are used to trigger the Logic App. Whenever an external or app or service makes an HTTP POST to the callback URL, the Logic App fires, and includes any data passed into the request. |
| API Connection Webhook | The API connection trigger is similar to the HTTP trigger in its basic functionality. However, the parameters for identifying the action are slightly different |
Create an HTTP endpoint for your Logic App
To create an HTTP endpoint to receive an incoming request for a Request Trigger, follow these steps:
- Open the Logic App Designer in your Logic App.
- Select Blank Logic App under Templates.
- Search for http and select Request – When a HTTP request is received.
- Optionally enter a JSON schema for the payload that you expect to be sent to the trigger. This schema can be added to the Request Body JSON Schema field. To generate the schema, select the Use sample payload to generate schema link at the bottom of the form. This displays a dialog where you can type in or paste a sample JSON payload. The advantage of having a schema defined is that the designer will use the schema to generate tokens that your logic app can use to consume, parse, and pass data from the trigger through your workflow.

Enter a JSON schema
- After saving, the HTTP Post URL is generated on the Receiver trigger. This is the URL your app or service uses to trigger your logic app. The URL contains a Shared Access Signature (SAS) token used to authenticate the incoming requests.

The generated HTTP POST URL for the trigger
Create custom and long-running actions
You can create your own APIs that provide custom actions and triggers. Because these are web-based APIs that use REST API endpoints, you can build them in any language you like.
API apps are preferred because to host your APIs since they will make it easier to build, host, and consume your APIs used by Logic Apps. Another recommendation is to provide an OpenAPI (Swagger) specification to describe your REST API endpoints, their operations, and parameters. This makes it much easier to reference your custom API from a Logic App workflow because all of the endpoints are selectable within the designer. you can use libraries like Swashbuckle to automatically generate the OpenAPI file for you. You can read more about Azure’s API Service in Design Azure App Services API Apps.
If your custom API has long-running tasks to perform, it is more than likely that your Logic App will timeout waiting for the operation to complete. This is because the Logic App will only wait around two minutes before timing out. If your task takes several minutes or even hours to complete, you need to implement a REST-based async pattern on your API. These types of patterns are already fully supported natively by the Logic Apps workflow engine, so you don’t need to worry about implementing it there.
Long-running action patterns
The asynchronous polling pattern and the asynchronous webhook pattern allow your Logic App to wait for long-running tasks to finish.
Asynchronous polling
The asynchronous polling pattern works the following way:
- When your API receives the initial request to start work, it starts a new thread with the long-running task, and immediately returns an HTTP Response 202 Accepted code with a location header. This immediate response prevents the request from timing out and causes the workflow engine to start polling for changes.
- The location header points to the URL for the Logic Apps to check the status of the long-running job. By default, the engine checks every 20 seconds, but you can also add a “Retry-after” header to specify the number of seconds until the next poll.
- After the allotted time of 20 seconds, the engine poll the URL on the location header. If the long-running job is still going, you should return another 202 Accepted with a location header. If the job was completed, return a 200 OK code with any relevant data. The Logic App will continue its workflow with this data.
Asynchronous Webhooks
The asynchronous webhook pattern works by creating two endpoints on your API controller the following way:
| Endpoint | Description |
| Subscribe | The Logic App engine calls the subscribe endpoint defined in the workflow action for your API. Included in this call is a callback URL created by the Logic App that your API stores for when work is complete. When your long-running task is complete, your API calls back with an HTTP POST method to the URL, along with any returned content and headers, as input to the Logic App. |
| Unsubscribe | The unsubscribe endpoint is called any time the logic app run is canceled. When your API receives a request to this endpoint, it should unregister the callback URL and stop any running processes. |
Monitor Logic Apps
To monitor your Logic Apps, you can use out-of-the-box tools within your Log App to detect any issues it may have. For real-time event monitoring and richer debugging, you can enable diagnostics and send events to OMS with Log Analytics, or to other services, such as Azure Storage or Event Hubs.
Select Metrics under the Monitoring menu and select the metrics you want to look at such as runs started or runs succeeded. You can configure the type of event and the time span you want to look at.
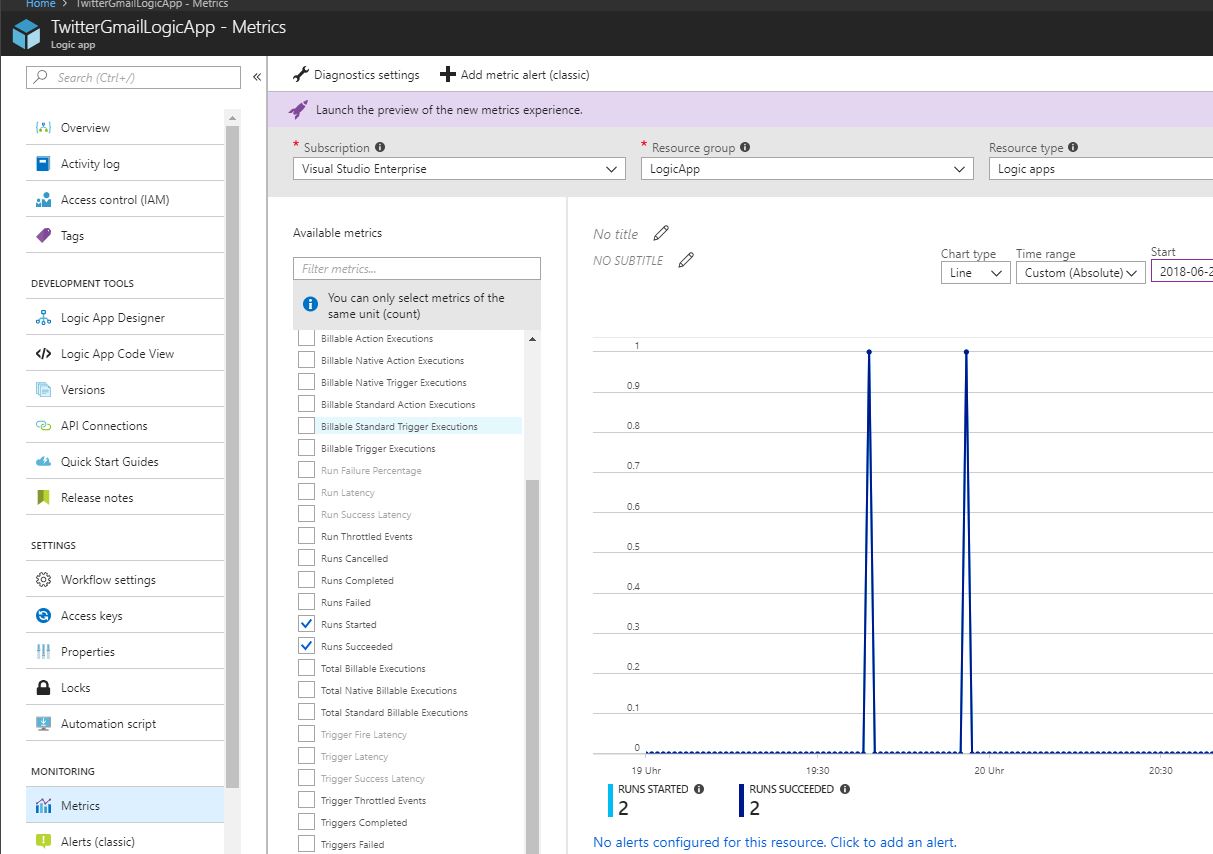
Monitoring your Logic App
On the Overview blade, you can see the history of the runs, the status, start time and duration.
Conclusion
In this post, I showed different operations which can be done with Logic Apps. Working with XML messages and transformation didn’t work well. Additionally the documentation from Microsoft is outdated and not helpful. My favorite part was using the Logic App to interact with Twitter and send an email when a certain hashtag was used. With Azure’s built-in connectors it would be easy to add image recognition or text recognition using AI. For example, I could analyze the images and if they are inappropriate, notify someone via email.
For more information about the 70-532 exam get the Exam Ref book from Microsoft and continue reading my blog posts. I am covering all topics needed to pass the exam. You can find an overview of all posts related to the 70-532 exam here.
Comments powered by Disqus.