

Model validation is the process of checking whether the user input is suitable for model binding and if not it should provide useful error messages to the user. The first part is to ensure that only valid entries are made. This should filter inputs which don’t make any sense. This could be a birth date in the future or an appointment date in the past. As important as checking for valid data is to inform the user about the wrong input and help him to enter the information in the expected form. Without any help, it can be frustrating and annoying for the user which might end up in losing a potential customer.
To help the developer, ASP.NET MVC provides several possibilities for model validation.
Setting up the project for Model Validation
I created a new ASP.NET MVC project with the empty template and add folders and core references for MVC.

Setting up the ASP.NET MVC project for model validation
Then I create a simple Home controller with two actions. The first action returns a view to the user to enter customer information and the second action processes the user input. In a real-world solution, the customer information would be stored probably in a database. In this example, I don’t do anything with it except passing to a second view to display the information.

Implementation of the Home controller
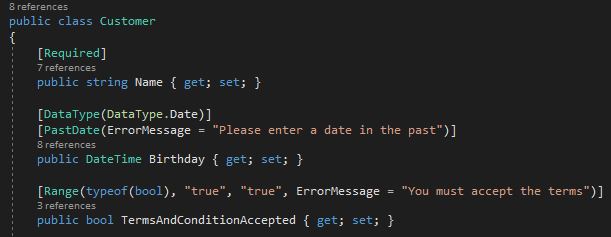
To work with customers, I need to implement a customer model. I want to keep the customer as simple as possible and therefore the class only has basic properties.

Implementation of the customer class
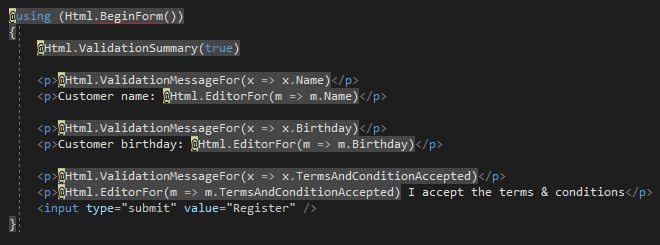
I keep the views simple too. The RegisterCustomer view takes a name, birthday and has a checkbox to accept the terms and conditions.

Register new customer view
Right now the user can enter whatever he wants and the application accepts it. To create a valid customer the user have to provide a name, a birth date (in the dd/mm/yyyy format) in the past and he must accept the terms and condition.
To enforce these requirements, I use model validation.
Explicitly validating a Model
One possible approach of checking if the model is valid is checking directly in the action.
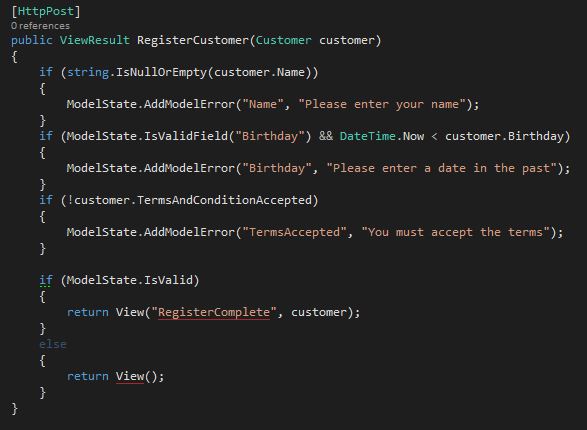
Validating the model directly in the action
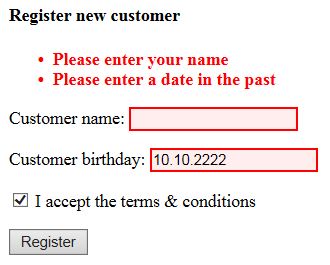
I check if every field contains the expected value. If not, I add a model error to the Modelstate. After I checked every attribute, I return the RegisterComplete view if the Modelstate is valid and if not I return the input view again.
I added some CSS to the HTML which colors the border of the element with the model error in red.
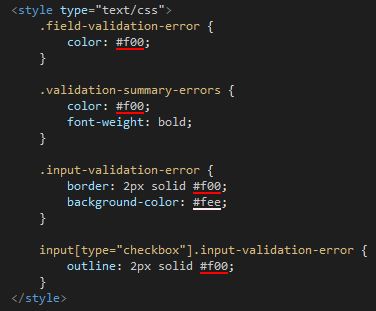
CSS to highlight model error in the view (Source)
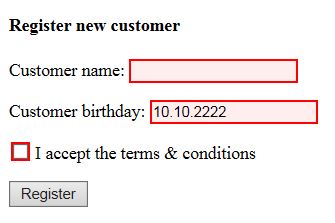
Highlighted errors in the view
Displaying error messages
Highlighting input fields which contain wrong values is a nice beginning but it doesn’t tell the user what is wrong. The MVC framework provides several helper methods to display useful error messages to the user. The simplest one is Html.ValidationSumary().
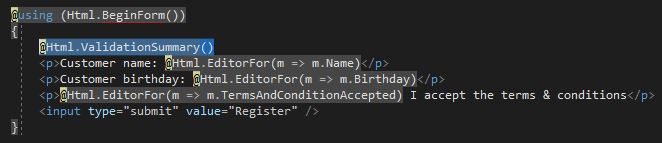
Displaying error messages with Html.ValidationSummar
This helper method adds all error messages above the form. If there are none, nothing will be rendered before the form.
Displaying error messages to the user
The Html.ValidationSummary helper has several overloaded implementations. See the following tables for the different versions:
| Overloaded Method | Description |
| Html.ValidationSummary() | Generates a summary for all validation errors |
| Html.ValidationSummary(bool) | If the bool parameter is true, then only model-level errors are displayed. If the parameter is false, then all errors are shown. |
| Html.ValidationSummary(string) | Displays a message (contained in the string parameter) before a summary of all the validation errors. |
| Html.ValidationSummary(bool, string) | Displays a message before the validation errors. If the bool parameter is true, only model-level errors will be shown. |
Model level validation messages
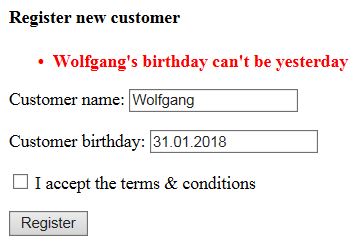
Another approach to validate a model is model level validation. This is used when you have to ensure that two or more properties interact correctly. I know it’s a stupid example but for whatever reason, you don’t allow a customers name to be Wolfgang with his birthday yesterday. Adding a model level error to the ModelState is also achieved by using the AddModelError with the difference that the first parameter is an empty string. Additionally, you have to pass true as the parameter for the ValidationSummary in the view.

Model level error implementation
Displaying the model level error message
Property level validation messages
Displaying all error messages on the top of the form might be ok if the form is as short as mine but if the form has 20 rows, the user will be confused with all the error messages. The solution for this is the ValidationMessageFor HTML helper. This method takes a lambda expression with the name of the property of which it should display the error message.
Implementation of the ValidationMessageFor helper for every input field

Displaying an error message for every input field
Validation using the Model Binder
The default model binder performs validation during the binding process. If it can’t bind a property, it will display an error message. For example, if you leave the birthday empty, the model binder will display a message prompting the user to enter a birthday.

Error message by model binder because of empty birthday field
The model binder also displays an error message if you try to enter an invalid value, for example, a string as birthday.
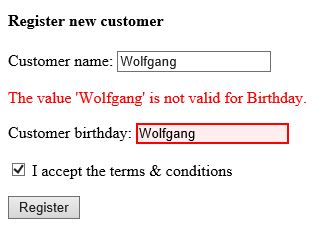
Error message by model binder because of the wrong value in the birthday field
Modern browsers like Chrome or Edge don’t even let the user enter a string. They offer a date picker to help the user entering the right value. The Internet Explorer, on the other hand, doesn’t offer this feature (surprise, surprise IE sucks).
Validation using Metadata
The MVC framework enables you to add attributes to properties of a model. The advantage of this approach is that the attributes and therefore the model validation are always enforced when the model is used.
Using built-in validation attributes in the model class
I applied the Required attribute with and without a specific error message and the Range attribute to ensure that the checkbox is checked. If there is no custom error, a default error will be displayed. It feels unnatural to use the Range attribute for a checkbox but the framework doesn’t provide an attribute for bool operations. Therefore, I use the Range attribute and set the range from true to true. ASP.NET MVC provides five useful built-in attributes for validation:
| Attribute | Example | Description |
| Compare | [Compare(“Password”)] | Two properties must have the same value. This is useful when you ask the user to provide the same information twice, such as an e-mail address or a password. |
| Range | [Range(5, 10)] | A numeric value must lie between the specified minimum and maximum values. To specify a boundary on only one side, use a MinValue or MaxValue constant—for example, [Range(int.MinValue, 10)]. |
| RegularExpression | [RegularExpression(“regex”)] | A string value must match the specified regular expression pattern. Note that the pattern has to match the entire user-supplied value, not just a substring within it. By default, it matches case sensitively, but you can make it case insensitive by applying the (?i) modifier—that is, [RegularExpression(“(?i)regex”)]. |
| Required | [Required] | The value must not be empty or be a string consisting only of spaces. If you want to treat whitespace as valid, use [Required(AllowEmptyStrings = true)]. |
| StringLength | [StringLength(12)] | A string value must not be longer than the specified maximum length. You can also specify a minimum length: [StringLength(12, MinimumLength=8)]. |
Validation using a custom property attribute
The ASP.NET MVC framework is highly custom able and therefore it is easy to implement your own attribute for validating a property. I don’t like the Range attribute for a checkbox and therefore I will create my own called MustBeTrue.
As I already said, implementing your own attribute is pretty simple. You only have to create a new class which derives from ValidationAttribute and then overrides the IsValid method.
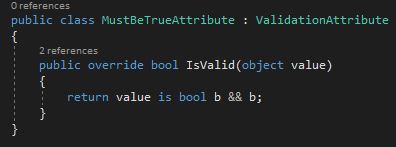
Implementation of a custom attribute for property validation
Now I can replace the Range attribute with the MustBeTrue attribute on the property.

Applying my custom attribute to a property
As you can see, I can still use the ErrorMessage property to display the same error message as before.
Implementing a custom property by deriving from a built-in property
You can also derive from a built-in validation property, for example, Required, and extend its functionality. I create a new validation property which derives from RequiredAttribute and override the IsValid method again. Then I return IsValid from the base class and my additional check. In this case, I want to make sure that the date is in the past.
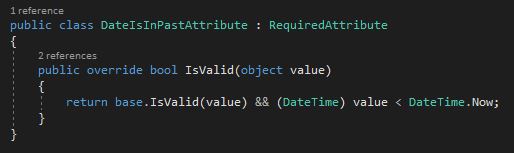
Extending the Required attribute with my custom validation
Performing client-side validation
All previous validation techniques are for server-side validation. This means that the user sends the data to the server, then it gets validated and sent back. Sending data back and forth uses a lot of bandwidth which can lead to problems if you have a very popular application or if the user has a slow connection, for example on his mobile phone. Therefore it would be better to do some validation on the client even before sending the data to the server. This reduces the amount of data sent back and forth and also increases the user experience.
Setting up client-side validation
To enable client-side validation change the values of ClientValidationEnabled and UnobtrusiveJavaScriptEnabled in the web.config to true.

Configuring web.config for client-side validation
The next step is to install the following NuGet packages:
- jQuery
- jQuery.Validation
- Microsoft.jQuery.Unobtrusive.Validation
The last step is to add these three Javascript files to your layout or view.
Using client-side validation
Using client-side validation is pretty simple. Just add validation properties to your model, for example, Required or StringLength.
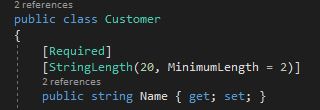
Adding validation attributes to the model for client-side validation

Error message from client-side validation
Thanks to client-side validation the user gets informed that the name has to be at least two characters long even before the form is sent to the server.
Client-side validation is a great feature. However, you still have to do server-side validation to ensure the integrity of the data.
Performing remote validation
Remote validation is a mix of server-side and client-side validation. It is often used to check whether an entered username or email is already taken. The check is performed in the background using ajax without the user doing anything. It is a pretty lightweight request but it still should be used for only some input fields since every input is sent back to the server which leads to a lot of requests.
Implementing remote validation
Implementing remote validation consists of two steps. The first step is to implement an action in your controller which returns a JsonResult and takes one string parameter.
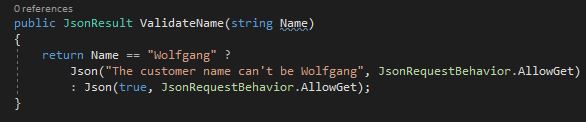
Implementation of the remote validation in the controller
In the action, I check if the customer name is Wolfgang. If it is Wolfgang, I return an error message. Note that the parameter is Name with an upper case N. I have to do this because the parameter has to match the name of the input field you want to check. I also have to allow Json GET requests because they are disallowed by the MVC framework by default.
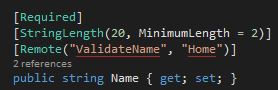
The second step is to add the Remote attribute to the Name property of the Customer class. Additionally, I add the validation method name and the controller.
Adding the remote attribute to the property of the model class
That’s it. When you enter a name, you will get an error message as soon as you have finished entering Wolfgang. If you change one letter, the error message will disappear.
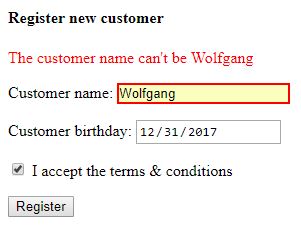
Remote validation of the customer name
Conclusion
In this post, I showed different approaches on how to perform model validation. Model validation is necessary to ensure data integrity and check whether the user entered the valid data.
For more details about model validation, I highly recommend the books Pro ASP.NET MVC 5 and Pro ASP.NET MVC 5 Plattform.
You can find the source code on GitHub.
Comments powered by Disqus.