

In my last post, I talked about the theory of a microservice. Today it is going to be more practical. I will create two microservices using ASP .NET Core 3.1. Over the next posts., I will extend the microservices using CQRS, Docker and docker-compose, RabbitMQ, and automatic builds and deployments.
This post is part of “Microservice Series - From Zero to Hero”.
Create a Microservice using ASP .NET Core 3.1
You can find the code of the finished demo on GitHub. I will talk about the key aspects of the microservice but not about every detail. You will need at least a basic understanding of C# and ASP.NET Core.
To-do list for the Microservice
Our two microservice should satisfy the following requirements:
- Implement a Customer API with the following methods: create customer, update customer
- Implement an Order API with the following methods: create order, pay order, get all orders which had already been paid
- When a customer name is updated, it should also be updated in the Order API
- The APIs should not directly call each other to update data
- ASP .NET Core 3.1 Web API with DI/IoC
- Communication between microservices should be implemented through some kind of queue
- Use DDD and CQRS approaches with the Mediator and Repository Pattern
To keep it simple, I will use an in-memory database. During the implementation, I will point out what you have to change if you want to use a normal database. I will split up the full implementation of these microservices over multiple posts.
In this post, I will create the microservices with the needed features. In the following posts, I will implement Swagger, create a Docker container, set up RabbitMQ and explain CQRS and the Mediator pattern.
Structure of the Microservice
I created a solution for each microservice. You can see the structure of the microservices on the following screenshot.

Structure of the Order Microservice
Both microservices have the same structure, except that the order solution has a Messaging.Receive project whereas the customer solution has a Messaging.Send project. I will use these projects later to send and receive data using RabbitMQ.
An important aspect of an API is that you don’t know who your consumers are and you should never break existing features. To implement versioning, I place everything like controllers or models in a v1 folder. If I want to extend my feature and it is not breaking the current behavior, I will extend it in the already existing classes. If my changes were to break the functionality, I will create a v2 folder and place the changes there. With this approach, no consumer is affected and they can implement the new features whenever they want or need them.
The API Project
The API project is the heart of the application and contains the controllers, validators, and models as well as the startup class in which all dependencies are registered.
Controllers in the API Project
I try to keep the controller methods as simple as possible. They only call different services and return a model or status to the client. They don’t contain any business logic.
The _mediator.Send method is used to call a service using CQRS and the Mediator pattern. I will explain that in a later post. For now, it is important to understand that a service is called and that a Customer is returned. In case of an exception, a bad request and an error message are returned.
My naming convention is that I use the name of the object, in that case, Customer. The HTTP verb will tell you what this action does. In this case, the post will create an object, whereas put would update an existing customer.
Validators
To validate the user input, I use the NuGet FluentValidations and a validator per model. Your validator inherits from AbstractValidator
Startup
In the Startup.cs, I register my services, validators and configure other parts of the application like AutoMapper, the database context or Swagger. This part should be self-explanatory and I will talk about Swagger or RabbitMQ later.
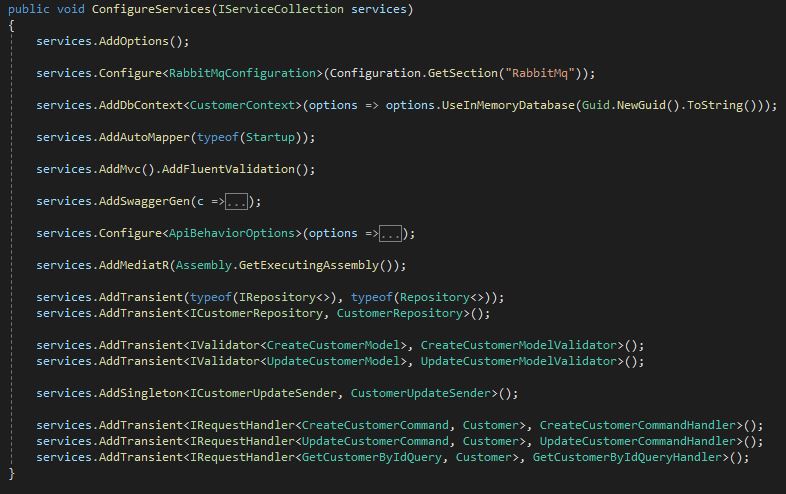
Register the classes and configure the services
Data
The Data project contains everything needed to access the database. I use Entity Framework Core, an in-memory database, and the repository pattern.
Database Context
In the database context, I add a list of customers that I will use to update an existing customer. The database context is created for every request, therefore updated or created customers will be lost after the request. This behavior is fine for the sake of this demo.
If you want to use a normal database, all you have to do is delete the adding of customers in the constructor and change the following line in the Startup class to use your connection string instead of using an in-memory database.
You can either hard-code your connection string in the Startup class or better, read it from the appsettings.json file.
Repository
I have a generic repository for CRUD operations that can be used for every entity. This repository has methods like AddAsync and UpdateAsync.
Additionally to the generic repository, I have a CustomerRepository that implements a Customer-specific method, GetCustomerByIdAsync.
The OrderRepository has more Order specific methods. The CustomerRepository inherits from the generic repository and its interface inherits from the repository interface. Since the CustomerContext has the protected access modifier in the generic repository, I can reuse it in my CustomerRepository.
Domain
The Domain project contains all entities and no business logic. In my microservices, this is only the Customer or Order entity.
Messaging.Send
The Messaging.Send project contains everything I need to send Customer objects to a RabbitMQ queue. I will talk about the specifics of the implementation in a later post.
Service
The Service project is split into Commands and Queries. This is how CQRS separates the concerns of reading and writing data. I will go into the details in a later post. For now, all you have to know is that commands write data and queries read data. A query consists of a query and a handler. The query indicates what action should be executed and the handler implements this action. The commands follow the same principle.
The handler often calls the repository to retrieve or change data.
Tests
For my tests, I like to create a test project for each normal project whereas the name is the same except that I add .Test at the end. I use xUnit, FakeItEasy, and FluentAssertions. Currently, there are no tests for the RabbitMQ logic.
Run the Microservice
In the previous section I only talked about the Customer service but the Order service has the same structure and should be easy to understand.
Now that the base functionality is set up, it is time to test both microservices. Before you can start them, you have to make sure that RabbitMQ is disabled in the OrderApi project. Go to the OrderApi and open the appsettings. There you have to make sure that Enabled is set to false:
Test the Microservice
After you made the changes to both APIs, you can start them. This should display the Swagger UI which gives you information about all actions and models and also lets you send requests. The UI should be self-explanatory but I will talk more about it in my next post.
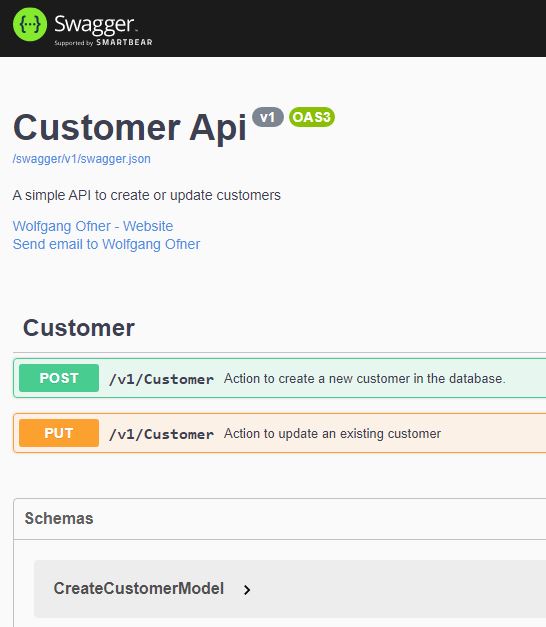
The Swagger UI with the available actions and models
Conclusion
Today, I talked about the structure and the features of my microservices. This is just the beginning but both applications are working and could be already deployed. It is important to keep in mind that each microservice has its own data storage and is kept as simple as possible.
In my next post, I will talk about Swagger and how you can use it to easily and quickly document your microservice while providing the opportunity to test requests.
Note: On October 11, I removed the Solution folder and moved the projects to the root level. Over the last months, I made the experience that this makes it quite simpler to work with Dockerfiles and have automated builds and deployments.
You can find the code of the finished demo on GitHub.
This post is part of “Microservice Series - From Zero to Hero”.
Comments powered by Disqus.